

Table of Contents
When the idea of creating a new website comes to mind, the name of ‘WordPress’ appears to be in the top preference. It is simply because of the worldwide popularity it holds and the amazing tools and resources it offers. With a WordPress website, one can simply lay the initial foundation of their online business, and this open-source content management system allows you to cultivate the digitization process without the need for complicated technical expertise.
Now, running a successful WordPress business requires proper optimization. The approach of SEO or Search Engine Optimization is essential to optimize a WordPress website to achieve a better representation in search results. The practice of SEO incorporates the genuine methods approved by popular search engines like Bing, Yahoo! and Google. The main purpose of search engine optimization is to make each webpage of your website easily discoverable by facilitating the search engine algorithm in indexing the content and information and presenting them in higher SERPs effectively. If you know the importance of top listing in Google search results then you must know the need for SEO.
WordPress itself is designed as SEO-friendly CMS, however, with the addition of an effective SEO plugin like All In One SEO, you can further optimize your WordPress powered website by adjusting certain settings.
Table of Contents
Everything You Need Know How To Use All In One SEO Pack In WordPress?
Why Use All In One SEO For A WordPress Website?
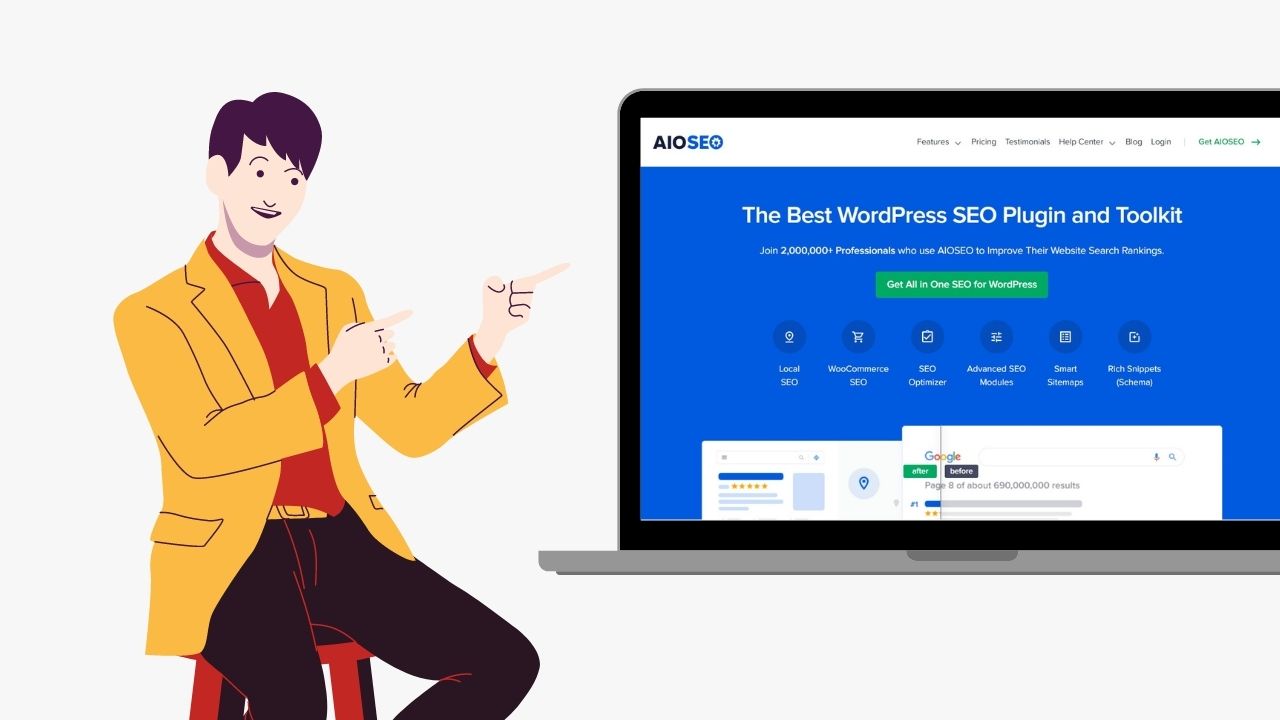
All In One SEO is one of the best SEO plugins for WordPress and it comes featured with amazing tools and resources that can make your website highly optimized for search engine algorithms. It is an easy-to-use and extremely useful plug-in that promotes Custom User Roles for having full-fledged control over major SEO features without transferring the access of your website to an outsourced webmaster.
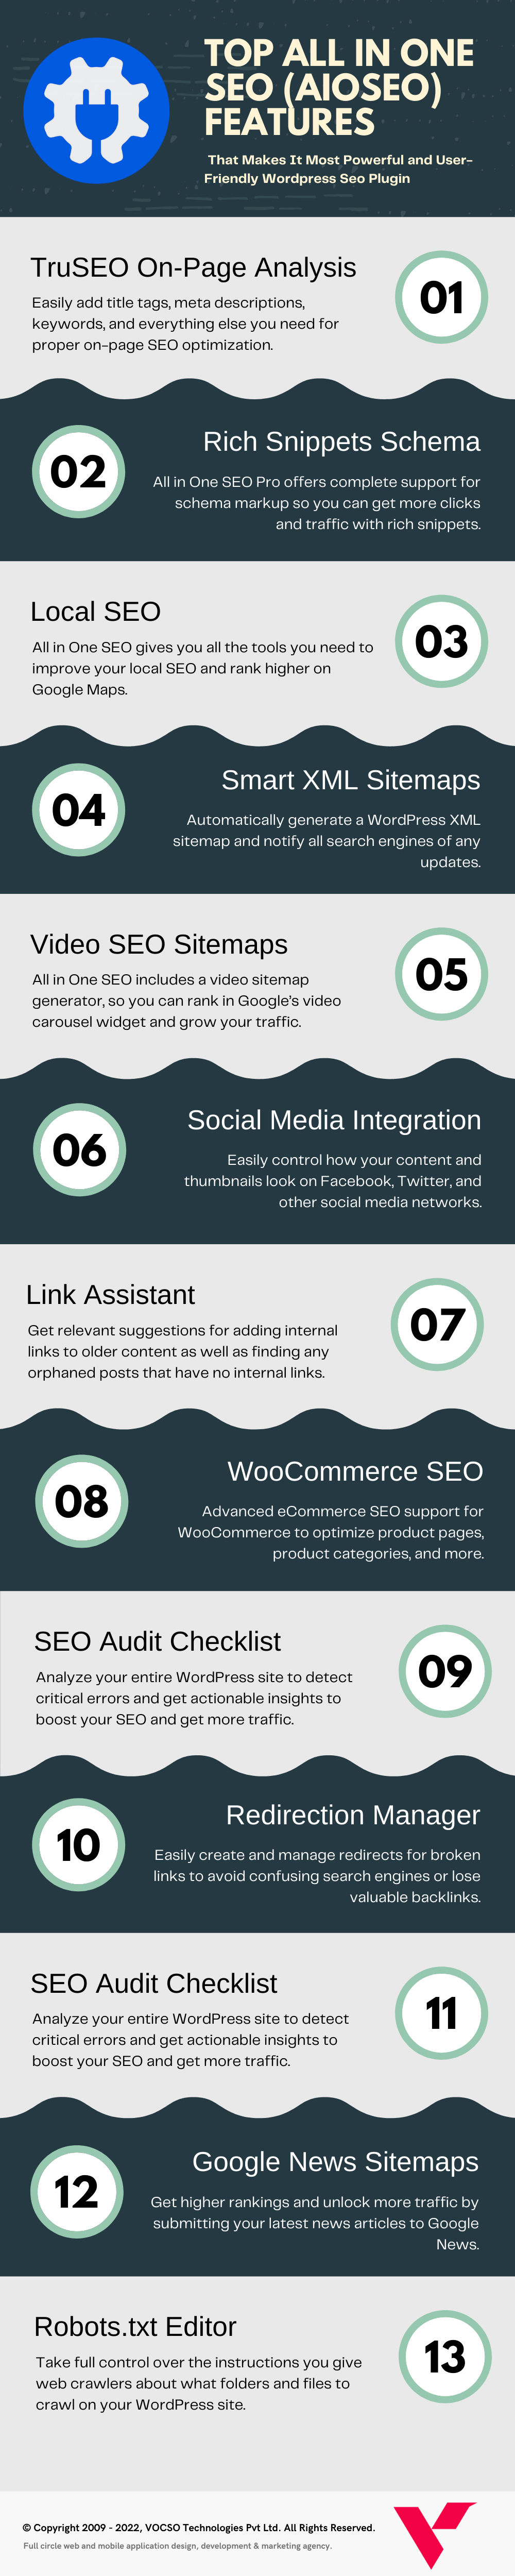
AIO SEO is exclusively designed for optimizing Google News Sitemaps to obtain higher rankings and unhitch more traffic by featuring the latest news articles on Google News. All in One SEO gives you all the tools you need to improve your local SEO and rank higher on Google Maps. It has a Rich Snippets Schema set up and allows you to take control of your RSS feed to add credits, custom text, and links, or even advertisements to help monetize your blog. This exclusive SEO plugin automatically generates a WordPress XML sitemap and notify all search engines of any updates.
While talking about Social Media Integration, AIO SEO helps in controlling the visual presentation of your content and thumbnails on Facebook, Twitter, and other social media networks. It features a TruSEO On-Page Analysis tool exclusively for the on-page SEO optimization process that includes adding title tags, meta descriptions, keywords, and etc. On the other hand, All in One SEO also enhances your website’s rank in Google’s video carousel widget with a video sitemap generator.
If you are running an eCommerce website, then AIO SEO can serve the ultimate purpose of optimizing product pages, product categories, and more through Woocommerce SEO. If you’re a marketer then you must know the website SEO health audit is necessary to know common and harmful issues that affect your search rankings. By installing this plugin on your WordPress Website, you can adeptly manage web crawlers and control SEO Audit Checklist in detecting critical errors and procreating actionable insights to promote your SEO and generate more traffic.
All in all, the AIO SEO plugin is replete with a plethora of features and can benefit your online business to a great extent. This gets easily integrated with other existing tools of your WordPress website and offers comprehensive support for Google Knowledge Graph and Schema.org markup for local businesses.
Installing And Setting Up All In One SEO For WordPress

As you have understood the significance and benefits of AIO SEO, the next is the installation process. To install the custom plugin of All In One SEO on your WordPress website, you need to have a Business Plan subscription. Here’s the step-by-step process of installation:
1st step: Visit the official website of All In One SEO and opt for user sign up at https://aioseo.com/login/ by using a valid email. Enter your unique username and password for secure login.

2nd Step: Click the My Account link in the top right corner of the website.
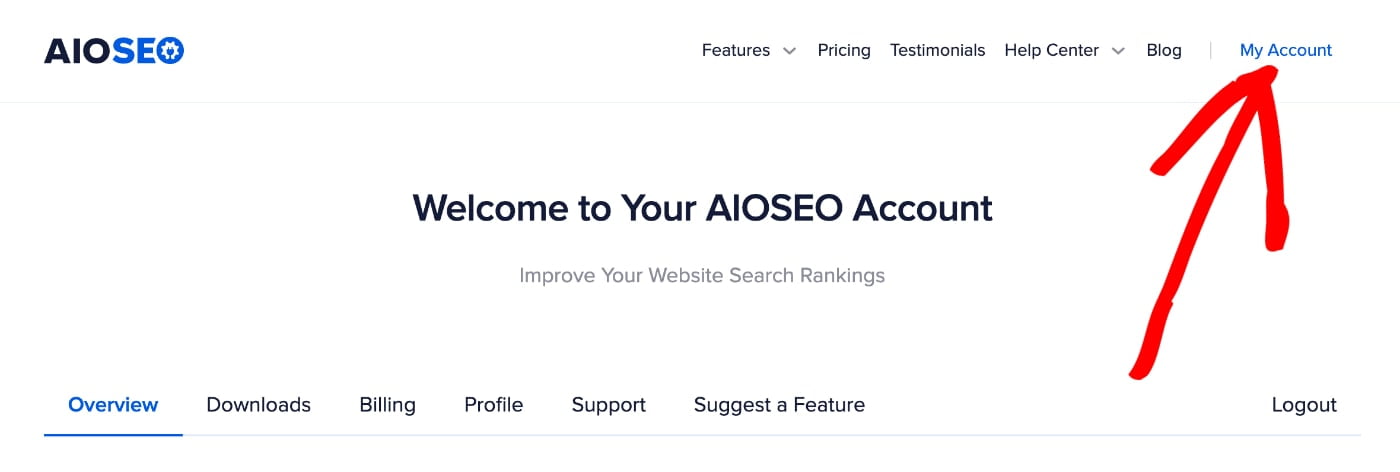
3rd Step: You will be redirected to a page where you need to click on the Downloads tab and then click the Download AIO SEO button. A ZIP file called All-In-One-SEO-pro.zip will download to your computer.
4th Step: Upload the ZIP file to your WordPress.com site by logging in to your WordPress website “My Site Dashboard” and navigate to Plugins in the left-hand menu.
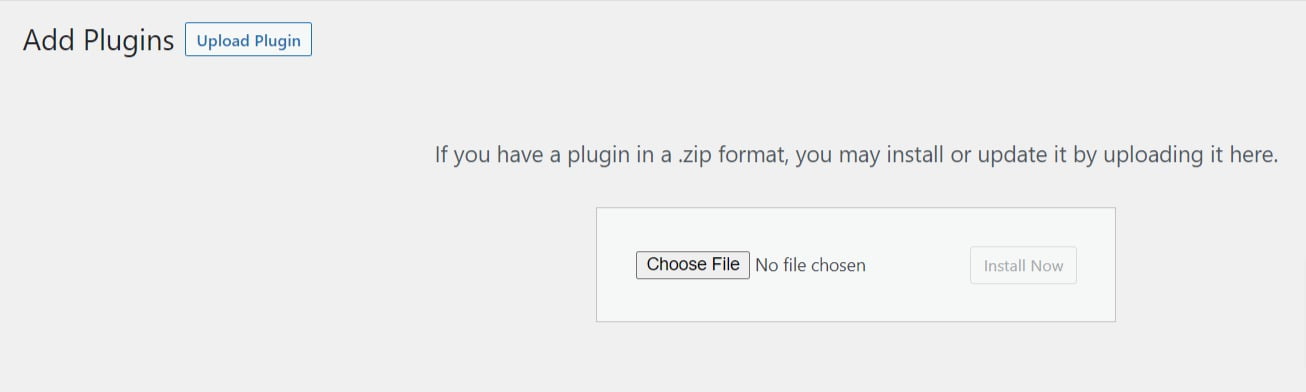
5th Step: Click on the Upload Plugin key in the top right corner of the screen. Drag and drop the ‘all-in-one-SEO-pro.zip’ file into the designated area or click on the field to navigate to the folder where the plugin file was downloaded to. WordPress.com will now automatically install and activate the plugin for you.
6th Step: To activate the plugin, navigate to the All in One SEO plugin in the WP Admin panel in the left-hand menu. Go to General Settings and lastly, enter the license key that you received in your purchase receipt email.
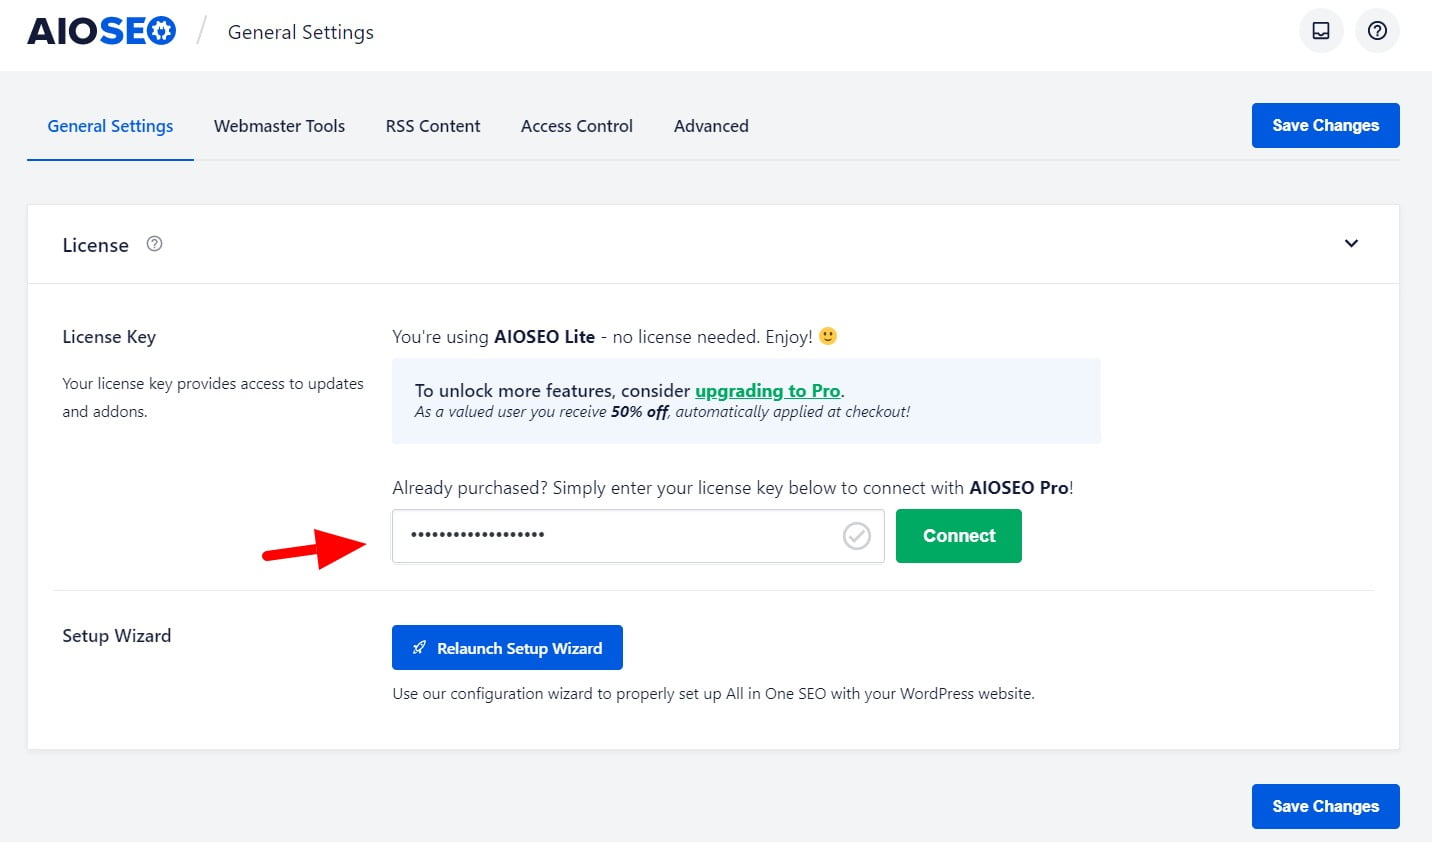
If you follow these steps properly as instructed, AIO SEO will only take 10 minutes to get successfully installed on your WordPress website.
General Settings In All In One SEO
To reap the ultimate benefits of AIO SEO and increase the growth of your website traffic, you have to perform some manual configuration settings. Check out this useful guide to understand the pattern of getting better:
All in One SEO operates pretty well out of the box with the default settings. Here are some important configuration settings that you should complete, to begin with:
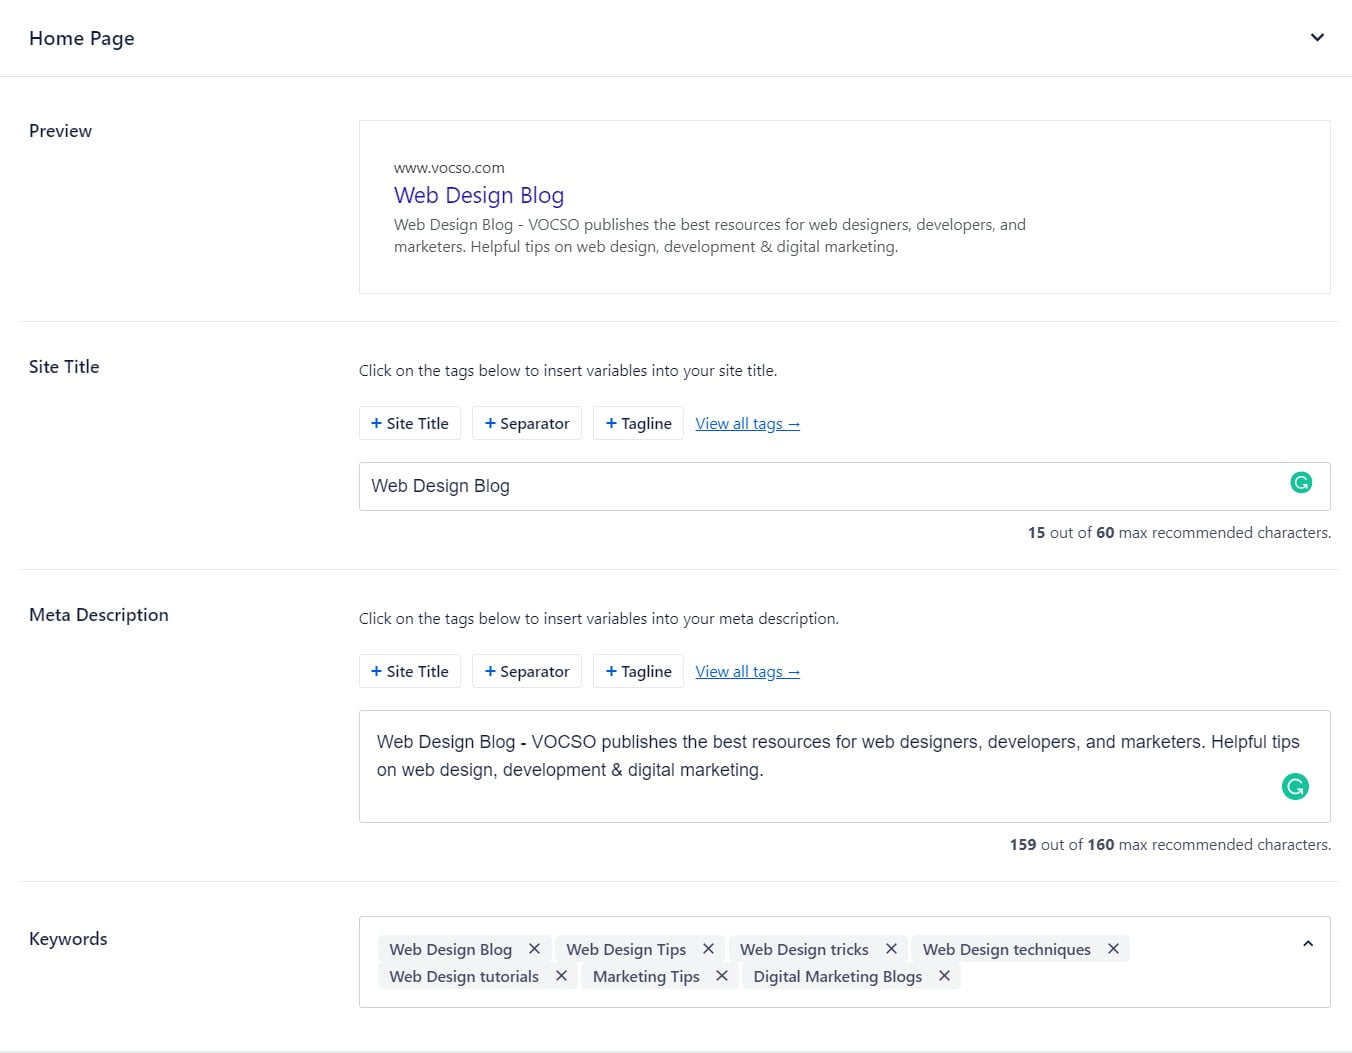
#1. Setting the SEO for Your Home Page
All in One SEO » Search Appearance » Global Settings
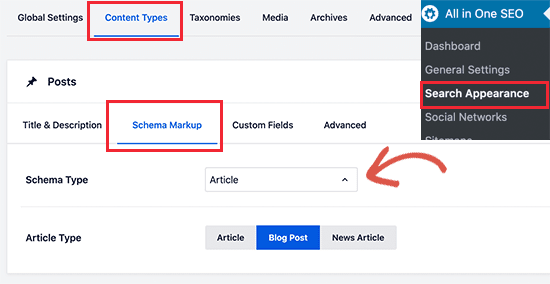
#2. Configuring the Schema Settings in All in One SEO
All in One SEO » Search Appearance » Content Types » Schema Markup
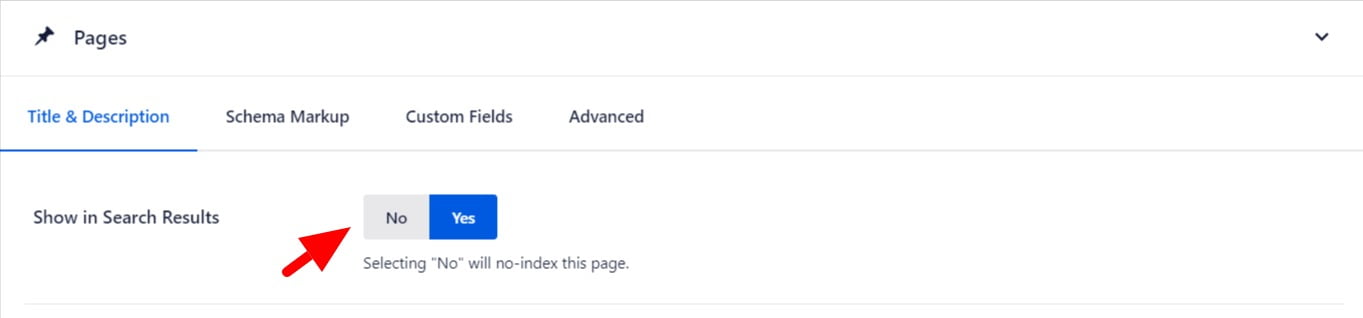
#3. Showing or Hiding Your Content in Search Results
All in One SEO » Search Appearance » Pages » Title & Description
#4. Setting the SEO Title and Description variables for Your Content (Post and Pages)
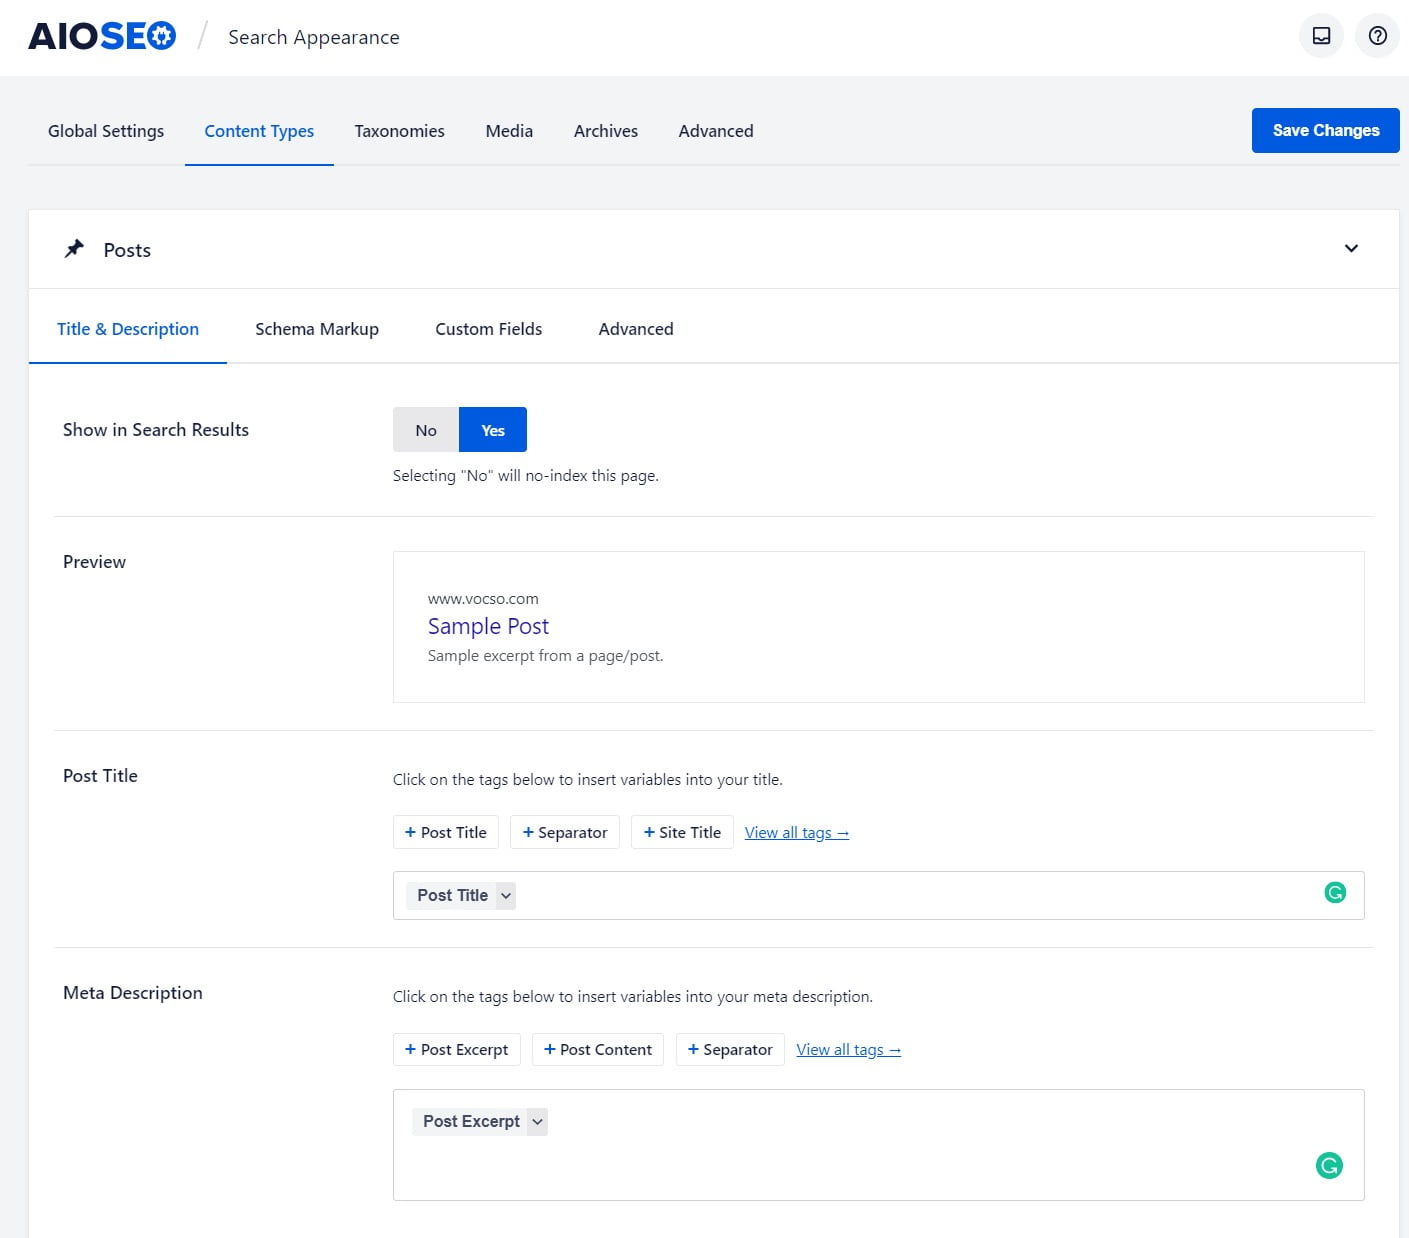
All in One SEO » Search Appearance » Content Types » Posts » Title & Description
#5. XML Sitemaps Setup in All in One SEO
All in One SEO » Sitemaps » General Sitemap
The aforementioned configurations are crucial for all site owners. After completing these settings, you need to create an XML Sitemap for your website. An XML sitemap is a directory of your website’s URLs. It serves as a roadmap to inform search engines what content is available and how to attain it. Check how to create a custom sitemap with AIO SEO by visiting- https://aioseo.com/docs/how-to-create-an-xml-sitemap/. Once, the sitemap is created, you need to submit its link to complete the process of Webmaster Tools Verification for the search engines where you want your website to be indexed.
#6. Webmaster Tools Verification
All in One SEO » General Settings » Webmaster Tools
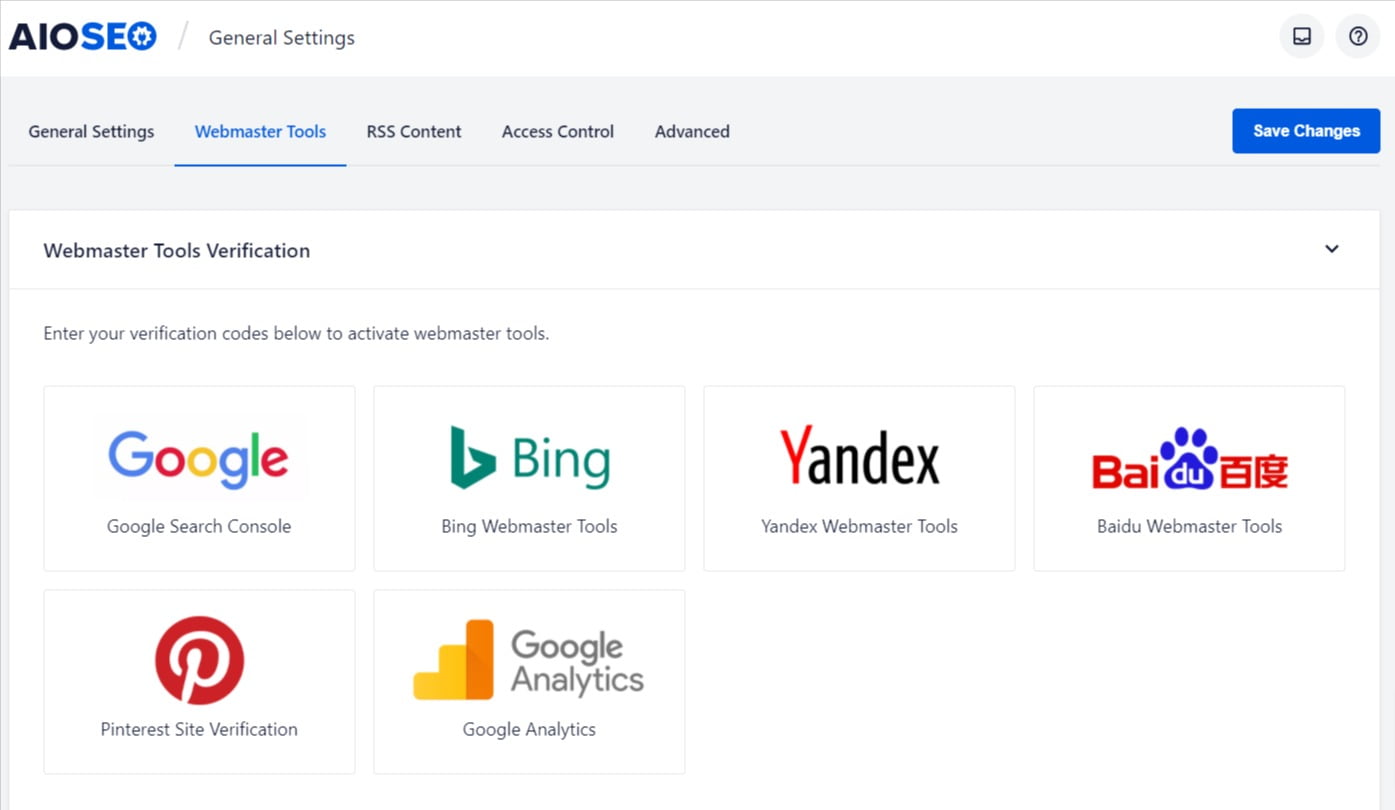
Webmaster Tools Verification is essential not only to authenticate the ownership of your website but also to make your website SEO-friendly by submitting the XML sitemap. Without Webmaster Tools Verification, the purpose of Search Engine Optimization can not be accomplished. The fulfilment of this process is required so that your website gets indexed by the major search engines like Google, Yahoo, Bing and many more. You just need to enter the verification code to verify the following Webmaster tools:
- Google Search Console
- Bing Webmaster Tools
- Yandex Webmaster Tools
- Pinterest verification
- Google Analytics
#7. RSS Content Settings
All in One SEO » General Settings » RSS Content
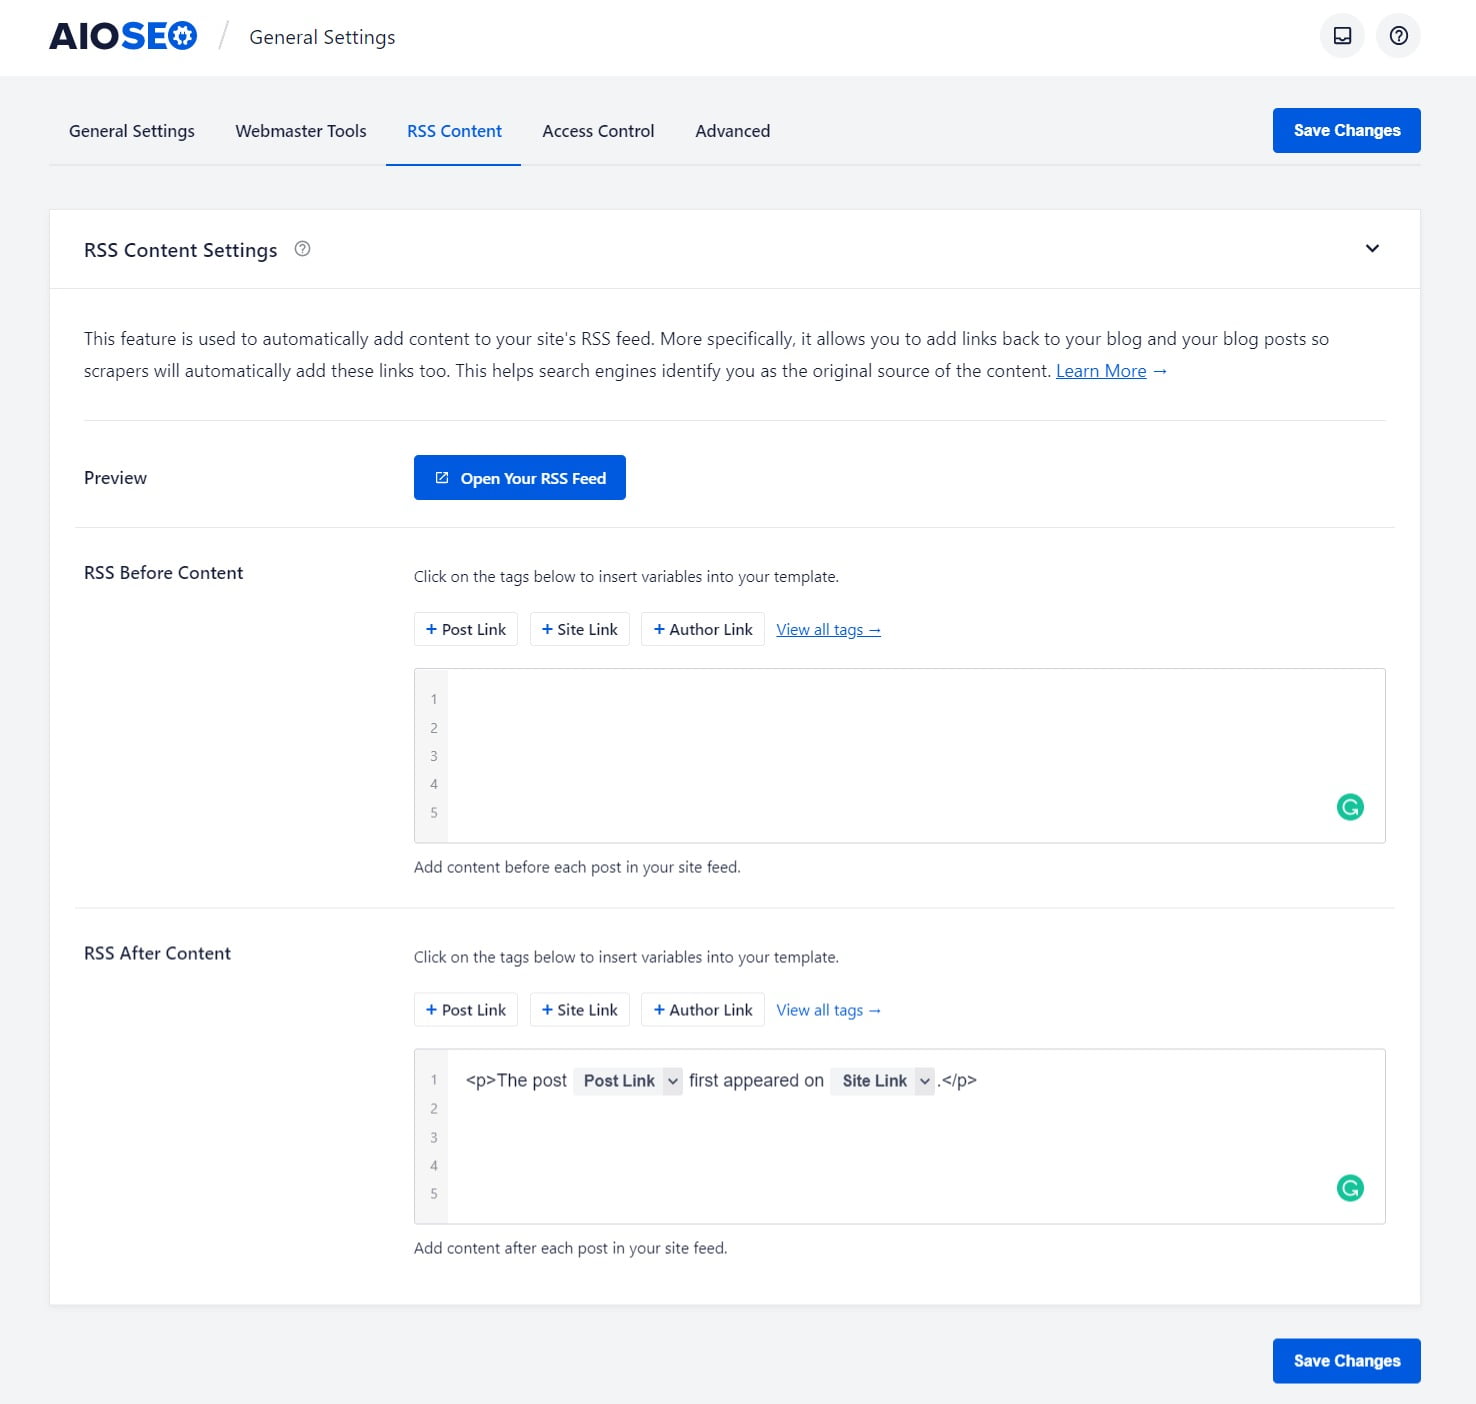
RSS (Really Simple Syndication) is a type of web feed that updates automatically when you post content on your website. RSS 3.7 All-in-one The content feature allows you to add links to your posts in your RSS feed. You only need to set it up once and it will automatically add content to your website feed before and after your RSS post. When you update to All in One SEO, you’ll notice your RSS Content Settings under General Settings, just above Advanced Settings. Read out RSS content settings documentation for more details on how to set up your RSS Content Settings for your website.
Search Appearance Setup in All in One SEO
#1. Global Settings
All in One SEO » Search Appearance » Global Settings
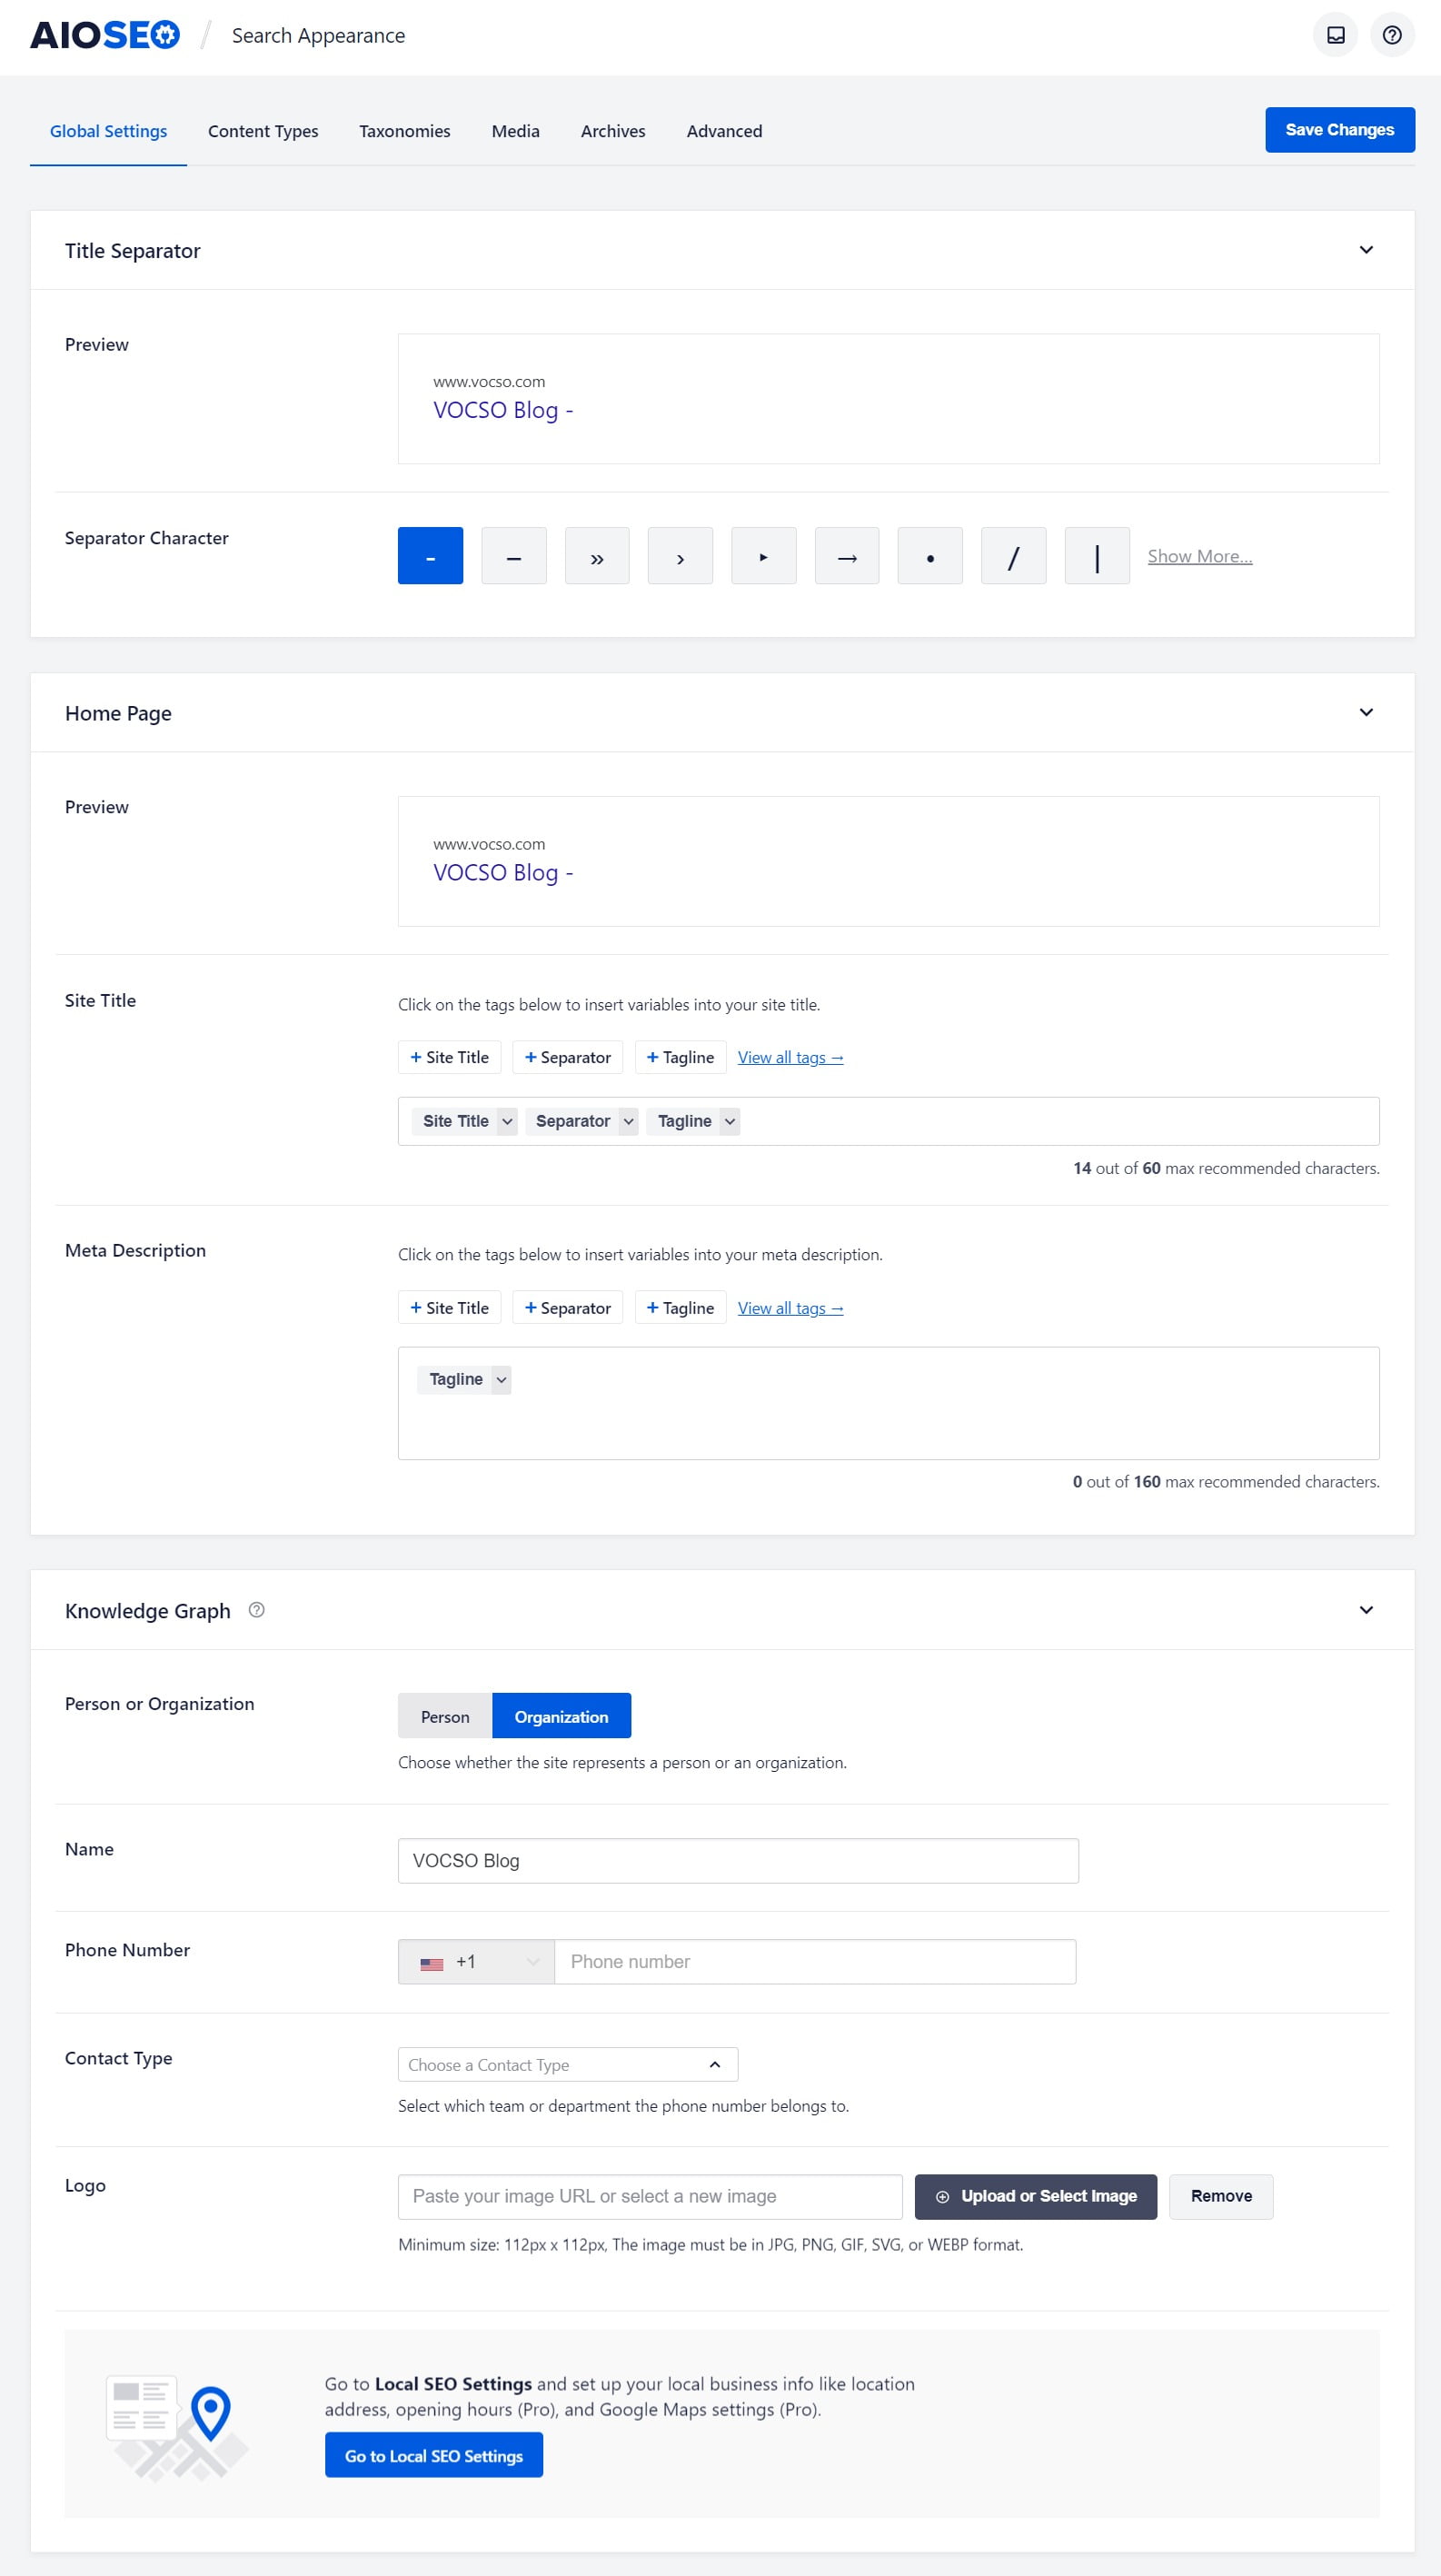
You can check this by going to Search Appearance » Global Settings in your WordPress Admin and check the Your homepage displays setting.
To set the SEO when your homepage displays your latest posts, click on Search Appearance in the All in One SEO menu. You should see the Home Page Settings section where you’ll see the Preview, Home Title, and Meta Description. The Preview shows how your homepage may look in search results based on the Home Title and Meta Description you set. To set the SEO title for your homepage, click on one of our smart tags shown above the Home Title field. You can also enter text in the Home Title field or combine text with the smart tags.
To set the SEO when your homepage displays a static page, edit your home page and scroll down to the AIOSEO Settings section. Here you’ll see the Snippet Preview, Page Title, and Meta Description. The Snippet Preview shows how your homepage may look in search results based on the Page Title and Meta Description you set.
To set the SEO title for your homepage, click on one of our smart tags shown above the Page Title field. You can also type the hash character ( # ) in the field to display a list of available tags you can choose from. You can also enter text in the Page Title field or combine text with the smart tags.
#2. Content Types
All in One SEO » Search Appearance » Content Types

Content-Type Settings have been replaced by Search Appearance in version 4.x of All in One SEO. Here’s a list of where to find the documentation for the new Search Appearance settings:
Show in Search Results
This setting allows your posts, pages, and templates to enable and disable to show in search results.
Title and Description
Optimize this setting to insert variables into your posts, pages, and templates title and description.
Robots Meta Settings
Use this setting to allow Robots Meta tag to get access to the bots to visit your website pages.
Using Schema Markup in All in One SEO for WordPress
All in One SEO gives Google the properly formatted structured data to allow it to accurately understand your content and incorporate it in knowledge graph results. While rich snippets aren’t an immediate ranking factor, they can increase clicks and indirectly promote your rankings. Rich snippets improve your content in the search engine results pages (SERPs) and make your website appear more engaging. Having rich snippets in search results helps grow your click-through rate (CTR). CTR is a metric that estimates the number of clicks you get on your website through Google and other search engines.
The most straightforward way to implement rich snippets for your website can be done with help of the All in One SEO (AIOSEO) plugin for WordPress. Not only does AIOSEO offer schema markup functionality, but it also has all the SEO tools you need to maximize your traffic.
- Just go to the Search Appearance menu under All in One SEO. Click on Content Types, then click on Schema Markup to configure your settings.
- Next to Schema Type, select the type of rich snippet markup you want from the drop-down and then click on “Save Changes.”
- Now that you know how to implement rich snippets with AIOSEO, it’s time to validate them. You are suggested to double-check your implementation through a structured data testing tool like Google’s Rich Result Testing Tool.
- Enter the URL where you implemented the rich snippet and click on Test URL. If no error is shown, your page will be eligible for rich snippets.
And the setting is finished! It doesn’t require any coding, custom fields setting, or the addition of a new schema plugin. With AIOSEO, you can easily implement rich snippets on WordPress with a couple of clicks.
#3. Taxonomies
All in One SEO » Search Appearance » Taxonomies
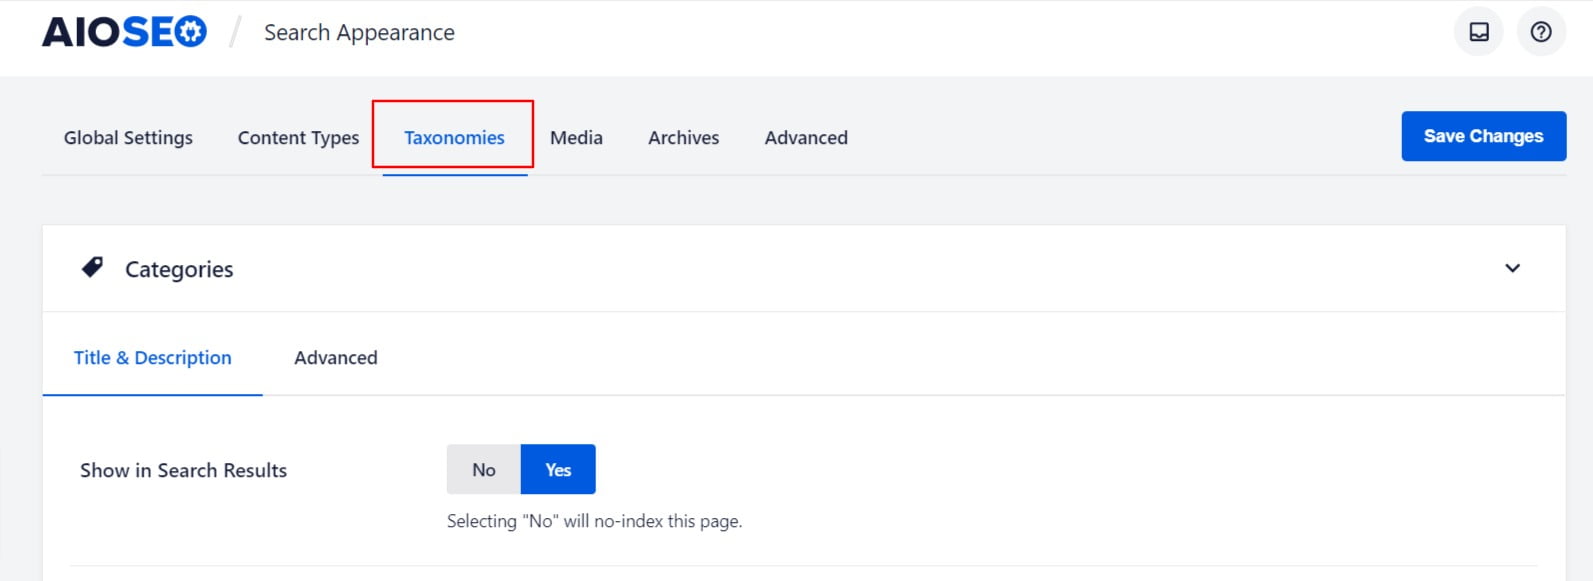
To get started, click on Search Appearance in the All in One SEO menu and then click on the Taxonomies tab. Scroll down and you should see sections for each of your taxonomies. There will be a section for Product Categories where you’ll see the Preview, Category Title, and Meta Description.
These settings will be hidden if Show in Search Results is set to No. This is because you’ve chosen to not have this content appear on search engines. Change Show in Search Results to Yes if you want this content to appear in search engines.
The Preview shows an example of how your content may look in search results based on the Title and Meta Description formats you set.
#4. Media
All in One SEO » Search Appearance » Media
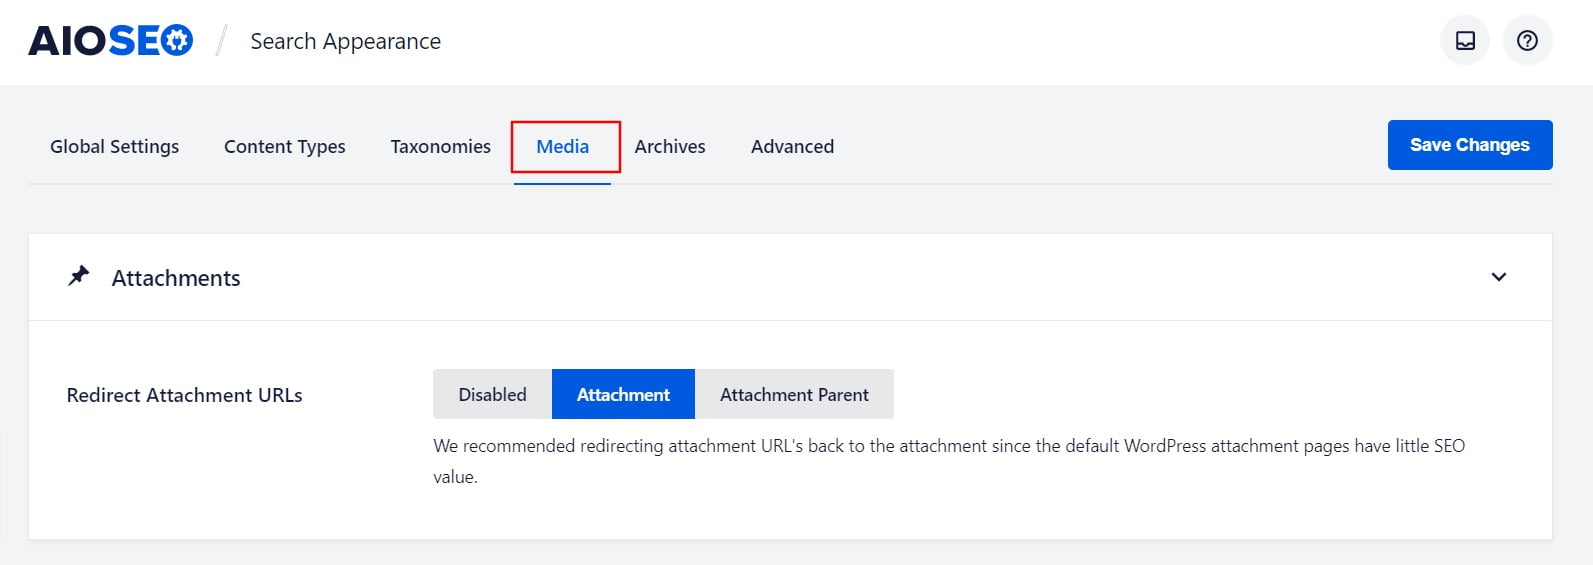
To get started, click on Search Appearance in the All in One SEO menu and then click on the Media tab. Scroll down to the Image SEO section. Click on the Activate Image SEO button to activate this feature.
The first setting you’ll see is Title Attribute Format. The title attribute appears when you mouse over an image. To set the title attribute format that will be used to automatically generate titles for images in the content of your posts, pages and other content, click on one of our smart tags shown above the Title Attribute Format field.
You can also enter text in the Title Attribute Format field or combine text with the smart tags. The next setting is the Strip Punctuation for Title Attributes toggle. Enable this if you want any punctuation characters to be removed from your image title attributes.
Next, you’ll see the Alt Tag Attribute Format setting. The Alternate text is used by screen readers and to tell visually impaired visitors what the image is about. The Alternate text should therefore describe the image. This can also be helpful to search engines.
#5. Advanced Settings
All in One SEO » Search Appearance » Advanced Settings
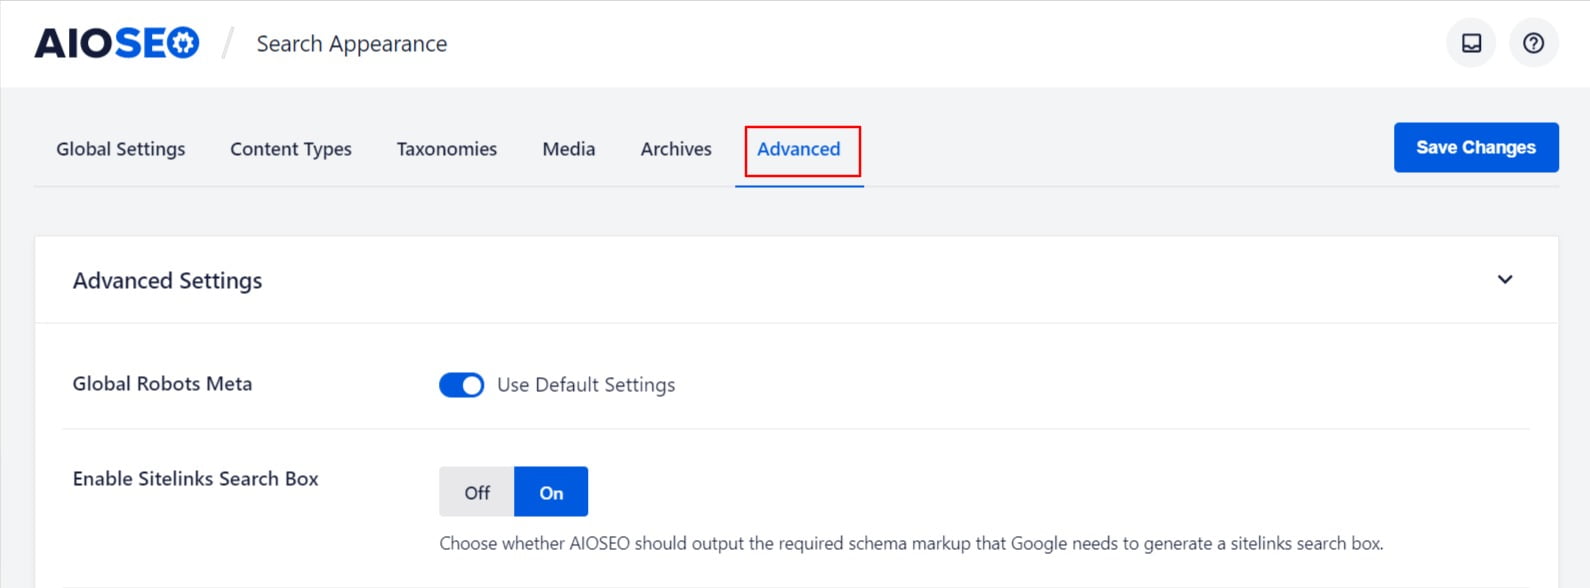
Global Robots Meta
All in One SEO has advanced settings for controlling a number of robots meta tags for your content. Note: These settings are meant for advanced users who understand the implications of using these robots meta tags.
Enable Sitelinks Search Box
A sitelinks search box gives the opportunity to your visitor to search your content immediately on the search engine results page.
No Pagination for Canonical URLs
Use this All in One SEO setting to remove the page numbers from the Canonical URLs used for your paginated content.
Use Meta Keywords
Use this setting if you want to show the keyword tag in your website pages.
Social Networks Settings in All in One SEO
All in One SEO » Social Networks
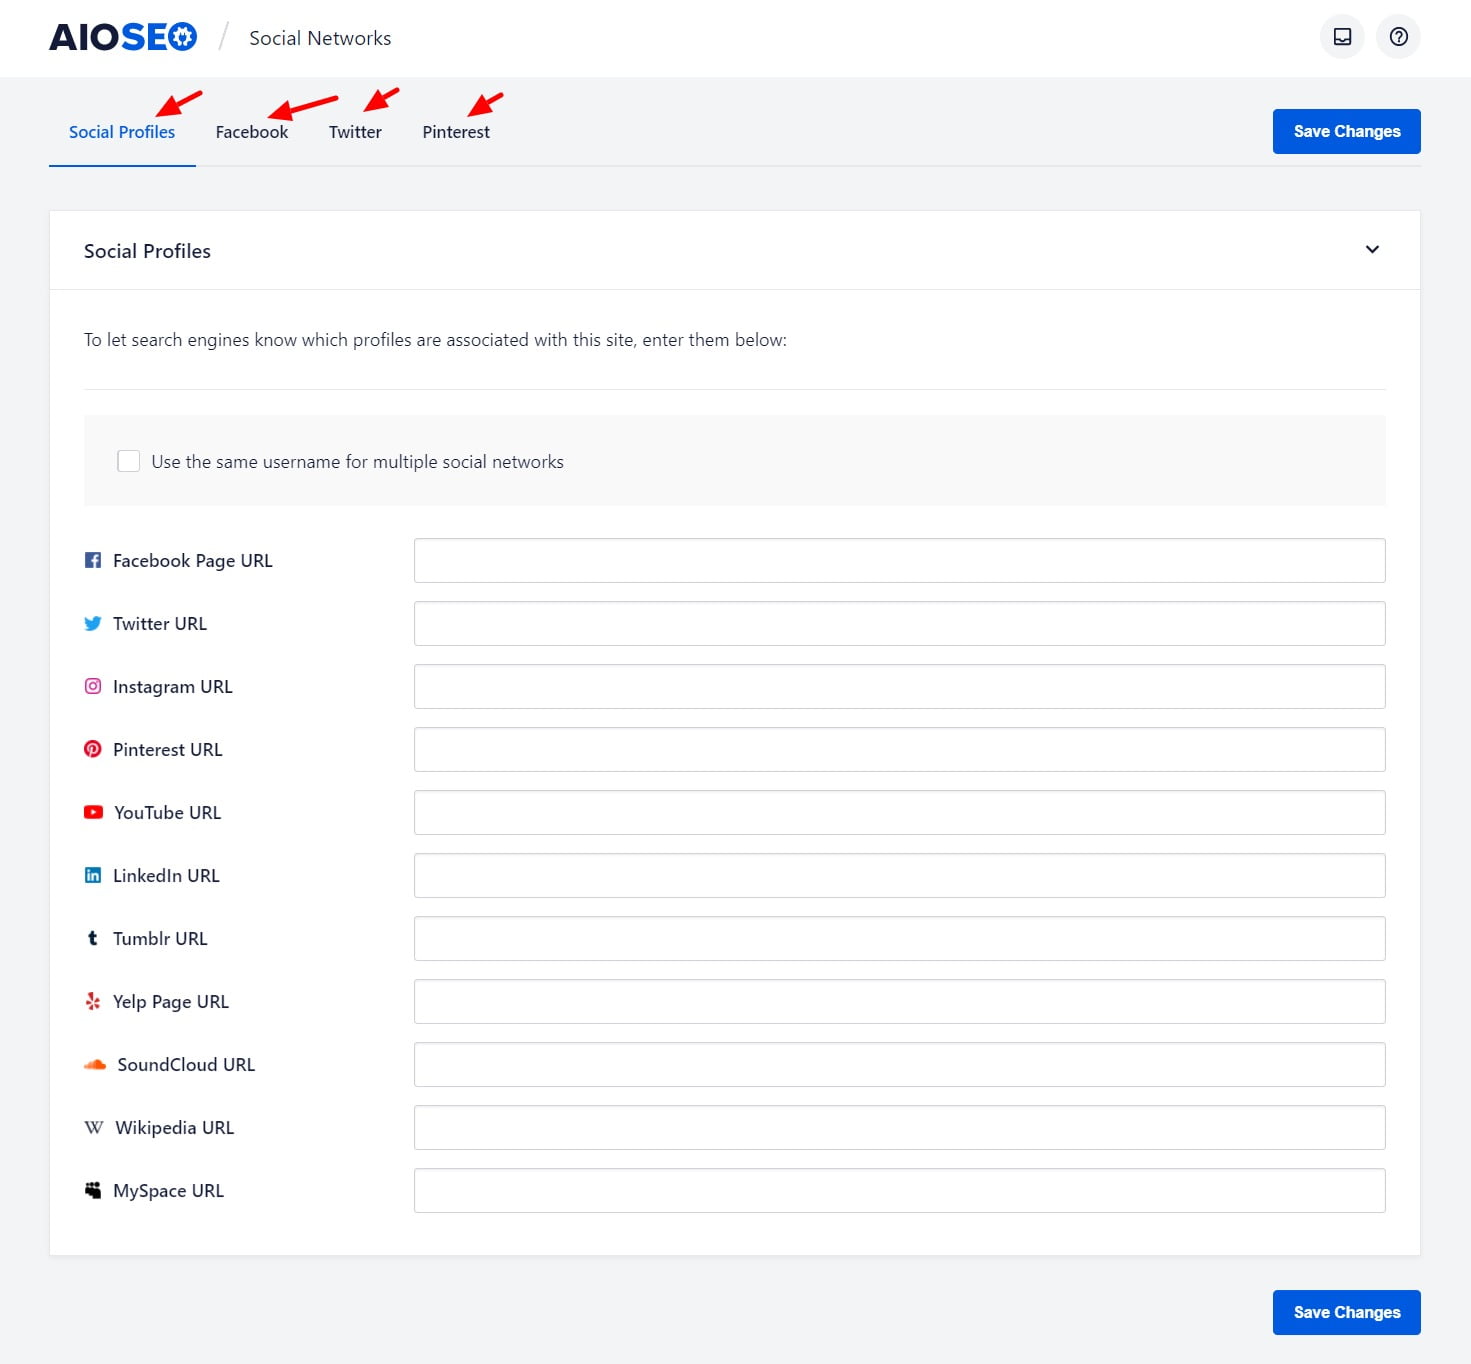
These days a solid presence on social media is just as essential as a solid ranking on search engines. Setting social media platforms on your responsive website can help you draw more followers, which could lead to more buyers or clients. By adding social share and follow buttons on your webpage, you’re allowing your content to become shareable and potentially viral. Here’s a step by step tutorial for Social Networks Settings in All in One SEO:
#1. Facebook Settings
All in One SEO » Social Networks » Facebook
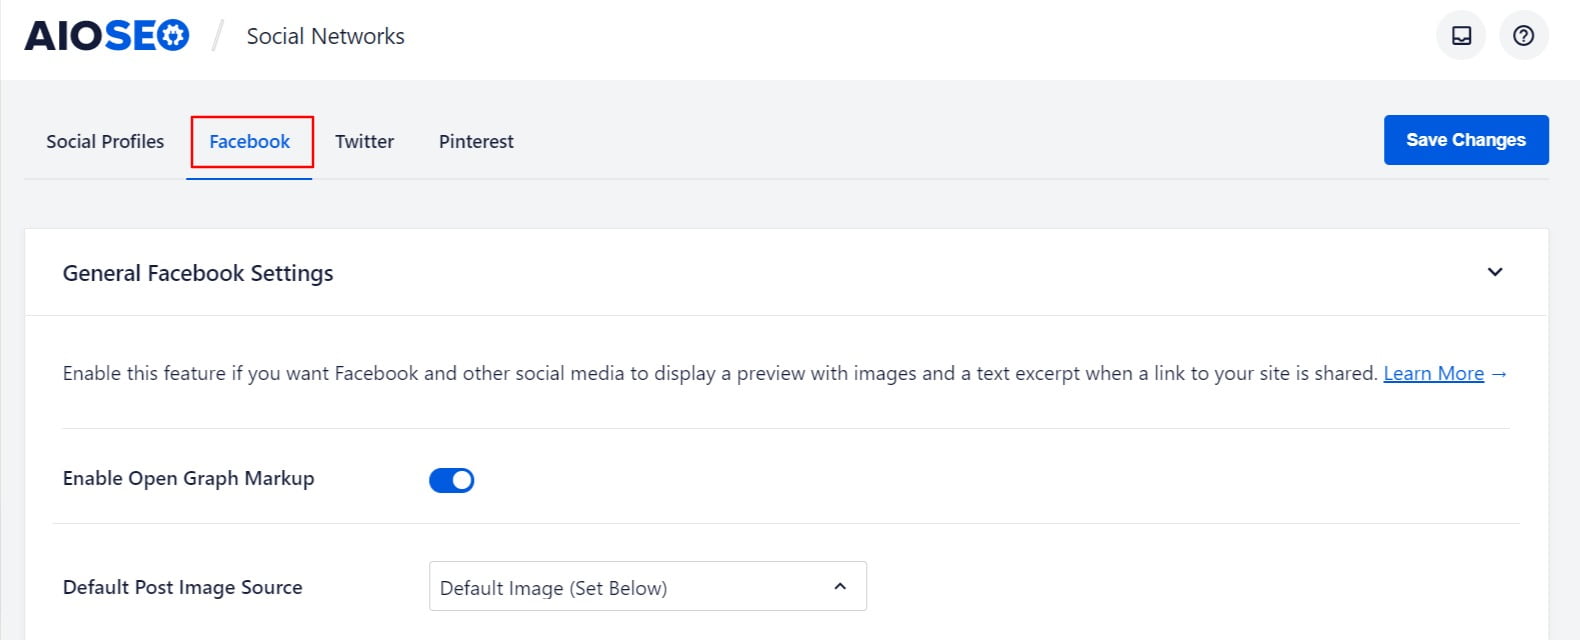
To get started, click on Social Networks in the All in One SEO menu and then click on the Facebook tab.
The first setting you’ll see is Enable Open Graph Markup. Make sure this is enabled.
For Facebook Image Settings, you need to choose which image is used when your content is shared on Facebook. You need to set a default Facebook image which will be used as a fallback if no other image is set. Next, you can choose which image is used when your content is shared on Facebook.
Now we’re going to move on to setting the title, description, and image for your homepage. Go to All in One SEO » Social Networks » General Facebook Settings » Home Page Settings in your WordPress site admin. If your home page displays your latest posts, then follow these instructions for Setting the Facebook Social Meta When Your Homepage Displays Your Latest Posts. If your homepage displays a static page, then follow these instructions for Setting the Facebook Social Meta When Your Homepage Displays a Static Page.
#2. Twitter Card Settings
All in One SEO » Social Networks » Twitter Card Settings
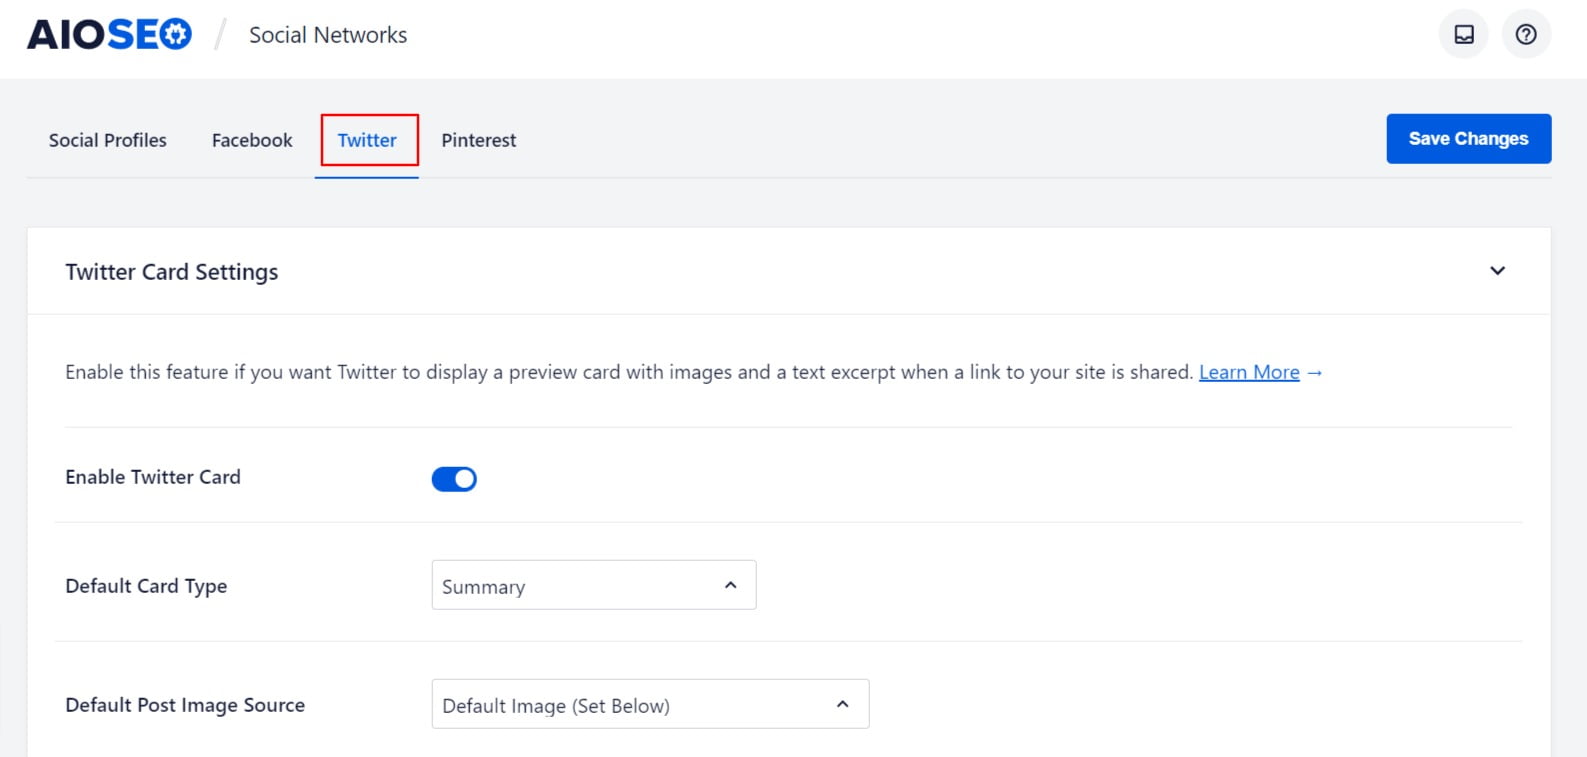
To get started, click on Social Networks in the All in One SEO menu and then click on the Twitter tab. The first setting you’ll see is Enable Twitter Cards. Make sure this is enabled.
To set the default card type for your content, click on Social Networks in the All in One SEO menu and then click on the Twitter tab. In the Twitter Card Settings, you should see the Default Card Typesetting.
You can use the drop-down in the Default Card Type setting to choose either Summary or Summary with Large Image. The Summary card type will display a title, description, and thumbnail image. The Summary with Large Image card type will display a title, description, and large image.
#3. Pinterest Settings
All in One SEO » Social Networks » Pinterest
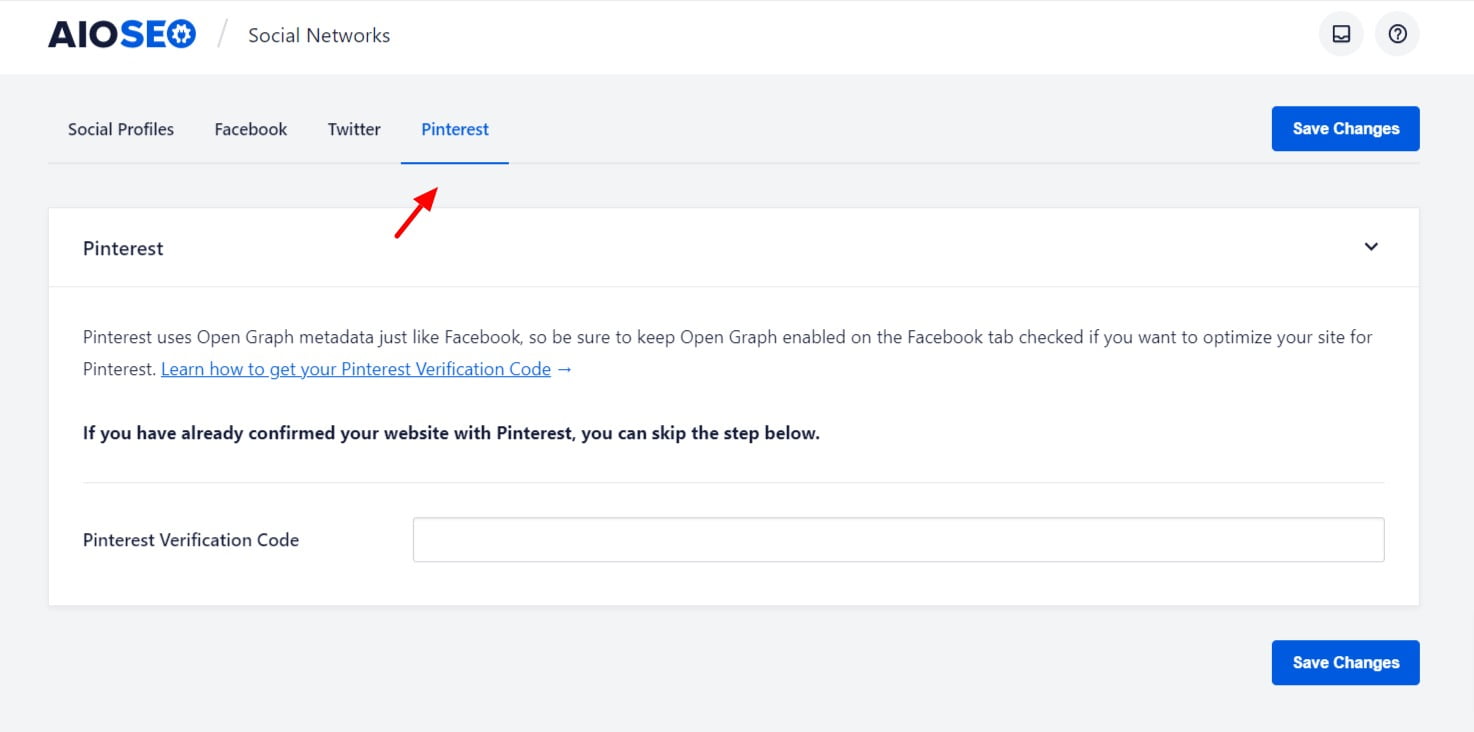
To get started, you’ll need to sign into Pinterest(if you’re not already signed in). Once you’ve logged in, click on the down arrow in the top left corner of the screen to display a menu, and then click on Settings.
Next, click on Claim in the menu on the left-hand side of the screen and you should see the Claim screen. Enter the URL for your site in the box and click the Claim button. You do not need to enter the HTTPS:// part of your URL.
Next, you’ll see a screen that says Pick claim option, and you’ll see two options. Choose the Add HTML tag option. Select the code in the Add HTML tag box with your mouse, right-click on the selected text and choose Copy.
Open a new browser window and log into your WordPress site. Click on General Settings in the All in One SEO menu and then click on the Webmaster Tools tab. Now click on the Pinterest Site Verification block and paste the code you copied into the Pinterest Verification Code field.
Now all that’s left is to go back to Pinterest in your other browser window and click the Next button, and then click the Submit button on the Submit for review screen. You should receive a notification once Pinterest has approved your request to verify your site.
Optimizing Your Website Pages And Blog Posts For SEO Using All In One SEO
#1. Post/Page Title
Posts/Pages » AIOSEO » General Settings » Page Title
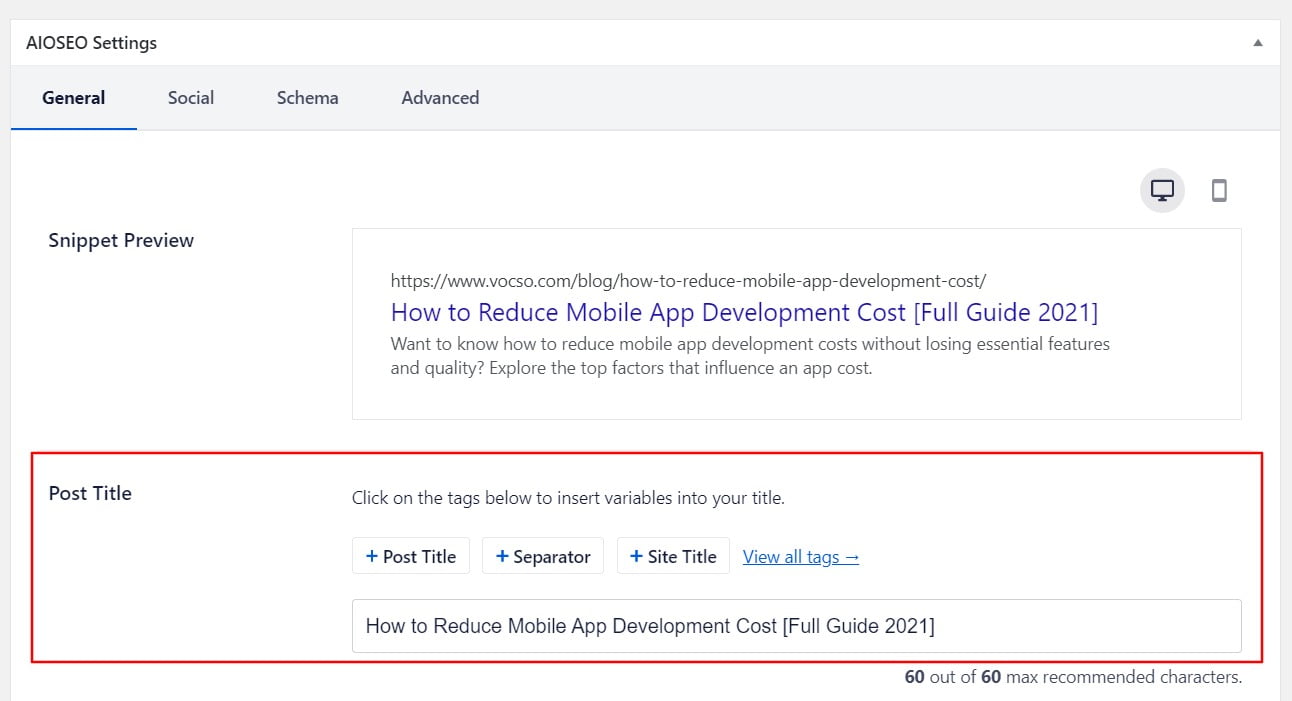
To get started, click on any posts or pages in the admin mentioned on the left-hand side then click on the post or page that you want to change. You can use this setting to fix the SEO title that a search engine used in their search results pages like below:

#2. Post/Page Meta Description
Posts/Pages » AIOSEO » General Settings » Description
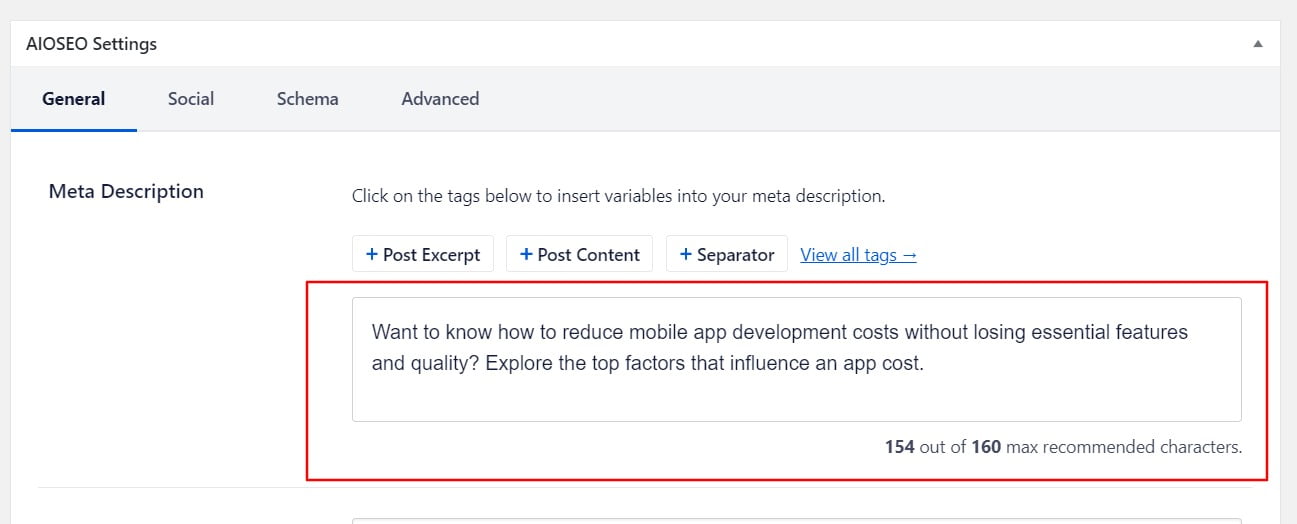
You can write the SEO description for your post or page by using the Meta Description field. This field works in the same way as the Post Title field. It’s one of the most important SEO ranking factors that Google and other search engines use to rank your pages.
#3. Focus Keyphrase
Posts/Pages » AIOSEO » General Settings » Focus Keyphrase
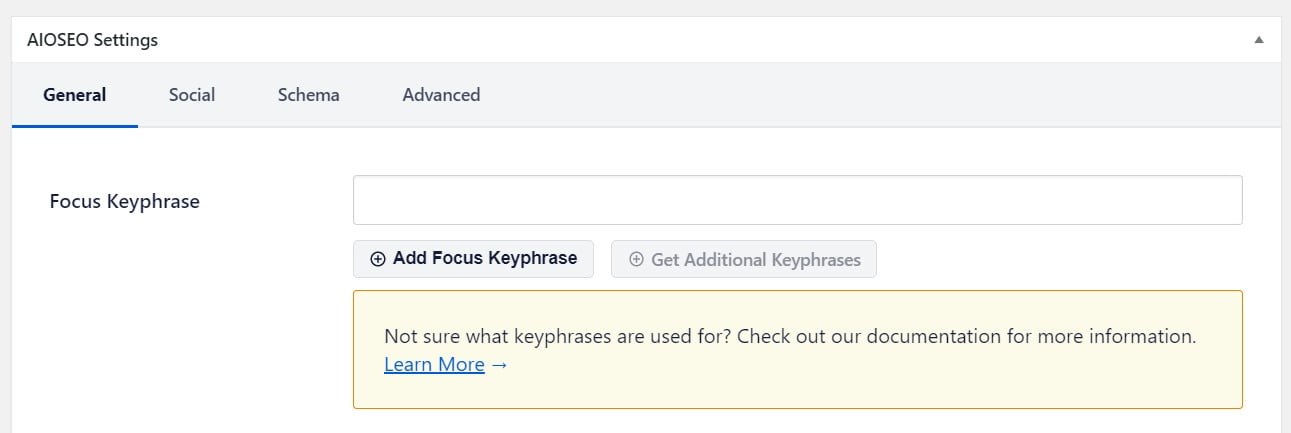
This setting enables you to add your focus keyword or keyphrase that you want to rank for your page or post. If you set a focus keyphrase for a page with All in One SEO, the plugin help in evaluating the page’s content gives you useful feedback on how you can improve the chance of the content rank higher for that search term.
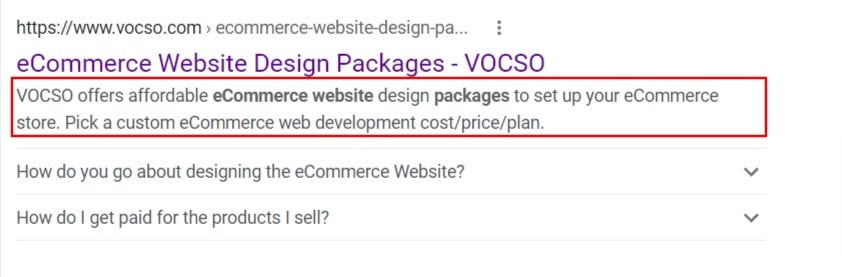
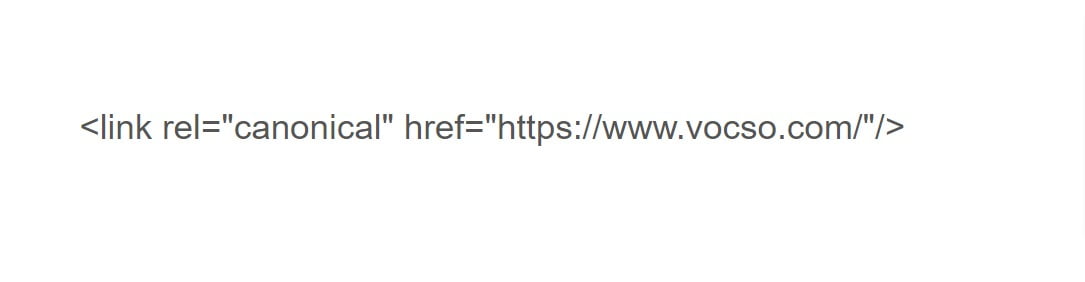
#4. Canonical URL
Posts/Pages » AIOSEO » Advanced » Canonical URL
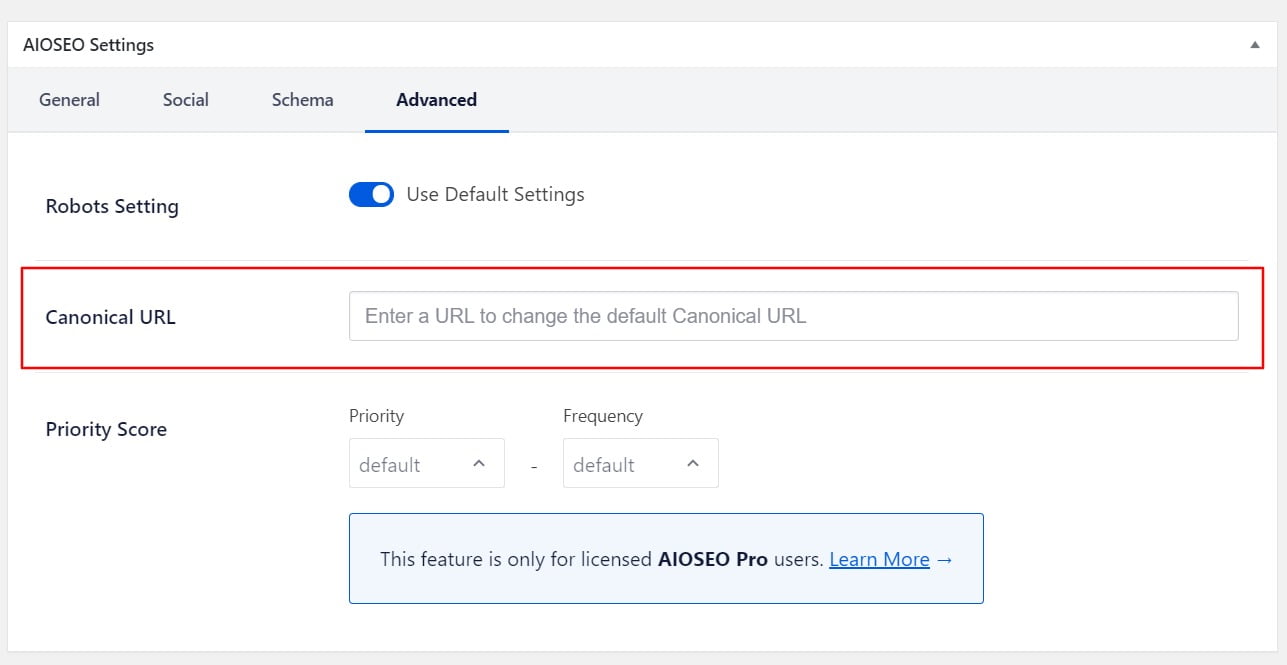
Canonical URLs are an indispensable part of SEO and are particularly significant with WordPress. They ensure that search engines don’t get disoriented when several URLs point to identical content. All in One SEO lets you designate your own canonical URL for any item of content. You can discover this setting by updating your content and scrolling down to the AIOSEO Settings section and click on the Advanced tab. Enter the full URL you want to set for the Canonical URL in the field. After updating the Canonical URL it will show in your websitesection like this:
#5. WooCommerce SEO using All in One SEO for WordPress
All In One SEO offers an amazing tool for eCommerce websites called WooCommerce which has exceptional SEO-friendly features to help businesses beat the market competition.
Product SEO titles are an important ranking factor and therefore, need to be catchy, engaging, and attractive to users while exercising your target keywords. All in One SEO provides you with all the tools you would require to efficiently optimize each product SEO title in your online store. Again, AIO SEO automatically fills your meta descriptions with the optimized content on the product pages. With WooCommerce SEO, you can easily enable breadcrumbs with a one-click setup so that Google quickly understands the structure of your site improving the SERPs rankings. WooCommerce further features an SEO addon for product image optimization.
If you want to include the attributes for a WooCommerce Product in the SEO title or Meta Description then, start by editing your product, and in the AIOSEO Settings section, click on the View all tags link above the Product Title or Meta Description fields. Now search for the Taxonomy Name smart tag and select it. In the Enter, a custom field name field, enter the name of your product attribute with pa_ in front of the name. For example, if you have a product attribute called Size, then you’d enter pa_size in the field. Thus, you can easily attribute your product to your SEO title or Meta Description.
Local Business SEO Setup
AIOSEO » Local SEO
Local SEO is a search engine optimization process that helps businesses rank on Google and other search engines’ local searches. Local SEO can be tricky and time-consuming if you’re doing everything manually. To make your life easier, you can use a local SEO WordPress plugin like All in One SEO (AIOSEO). Local SEO is all about optimizing for local SERPs and AIOSEO helps you rank well in local search results by:
- Structuring your business information to help Google understand your website better
- Adding a map to your contact page makes it easier for Google and other search engines to display it on local search results
- Increasing your website’s visibility and rankings on Google maps
With AIOSEO, you get tons of other features as well. You can easily optimize your content for on-page, add rich snippets, edit your robots.txt file from your WordPress dashboard, conduct an audit of your website or your competitors, and much more.
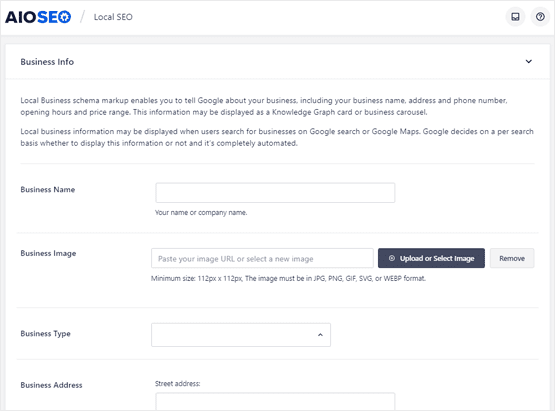
You can Add Local SEO Schema with AIOSEO by visiting AIOSEO main menu present on the WordPress dashboard and then click on Local SEO. There you can add all the necessary information about your business in the form. You can further add your business hours by clicking on the Opening Hours button. Add the data and then click on Save Changes once you’re done.
Next, you need to add a local search schema to enhance the ranking of your website on local search results and maps. This will bring in more traffic and visibility to your website. With AIOSEO, you can easily list your website on Google My Business (GMB) – one of the most important parts of optimizing your website for local SEO. Follow the steps:
Step 1: Enter Your Business Name and click on “Add your business to Google.” Then you need to type in your business name and click on Next.
Step 2: Choose the Category
Step 3: Enter Your Company’s Address
Step 4: Drag the pin on the map to mark your exact location.
Step 5: Add Other Contact Details (phone number and/or your website address)
Step 6: Verify your claim for GMB listing via phone or a postcard.
By following these easy steps, you can effortlessly add a Local SEO Scheme through the AIOSEO setting and avail yourself the complete advantage of the Google My Business local pack.
Sitemaps Setup
AIOSEO » Sitemaps
To get started, go to Sitemaps in the All in One SEO menu. You’ll see the General Sitemap screen and you should see that Enable Sitemap is on. If it’s off, you’ll want to turn it on. Click the Open Sitemap button to view your XML Sitemap.
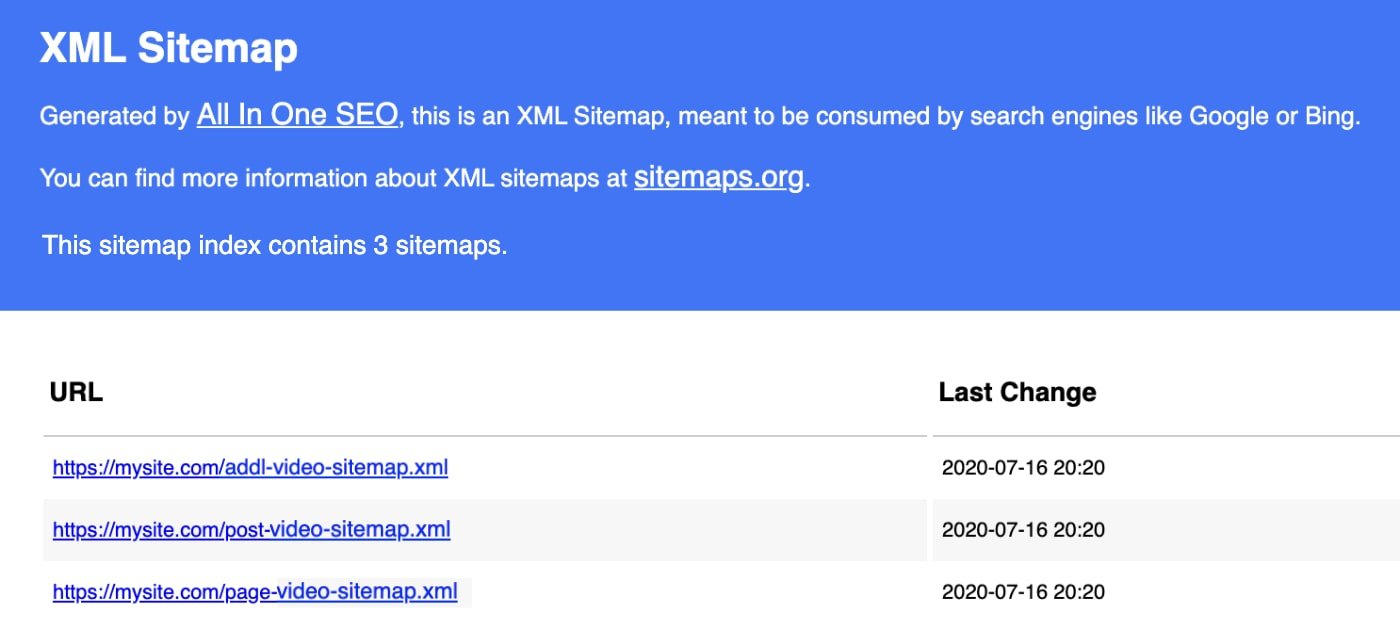
The index page lists all of the sitemaps for your site. Each sitemap contains a different type of content. For example, above you’ll see there’s one for Posts and one for Pages. Click on each link in the index to see the list of that content.
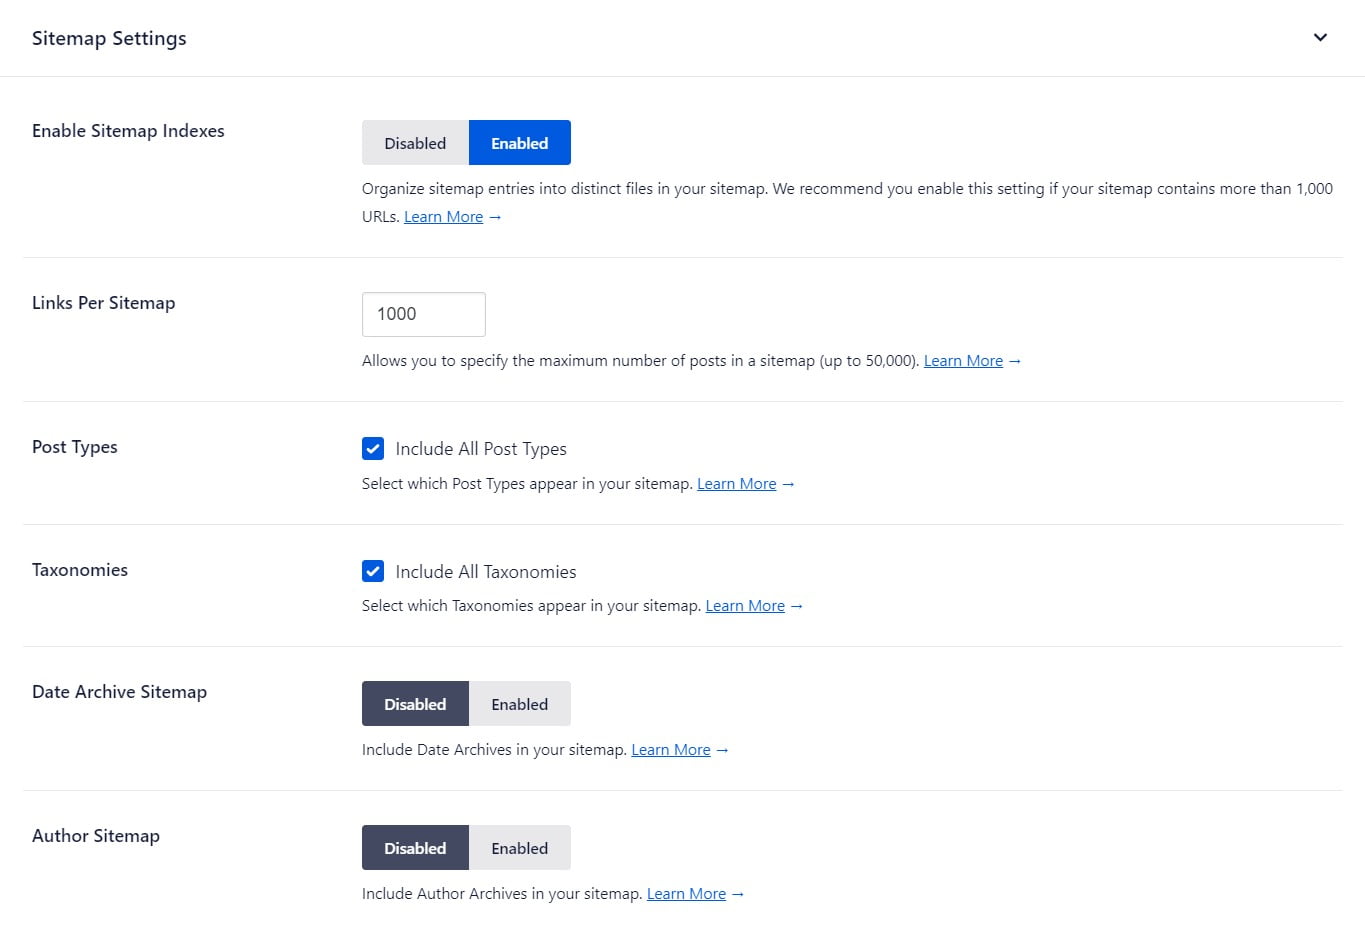
If your site is very small (less than a few hundred URLs) then you may not need an index page. You can go ahead and set Enable Sitemap Indexes to Disabled. If you’re in any doubt, just leave this set to Enabled.
When Sitemap Indexes are enabled, you’ll see a setting for Links Per Sitemap. Set Automatically Ping Search Engines to Yes. If you want to include all your content then you can leave the Include All Post Types and Include All Taxonomies checkboxes set to checked.
#1. XML Sitemap
AIOSEO » Sitemaps » General Sitemap
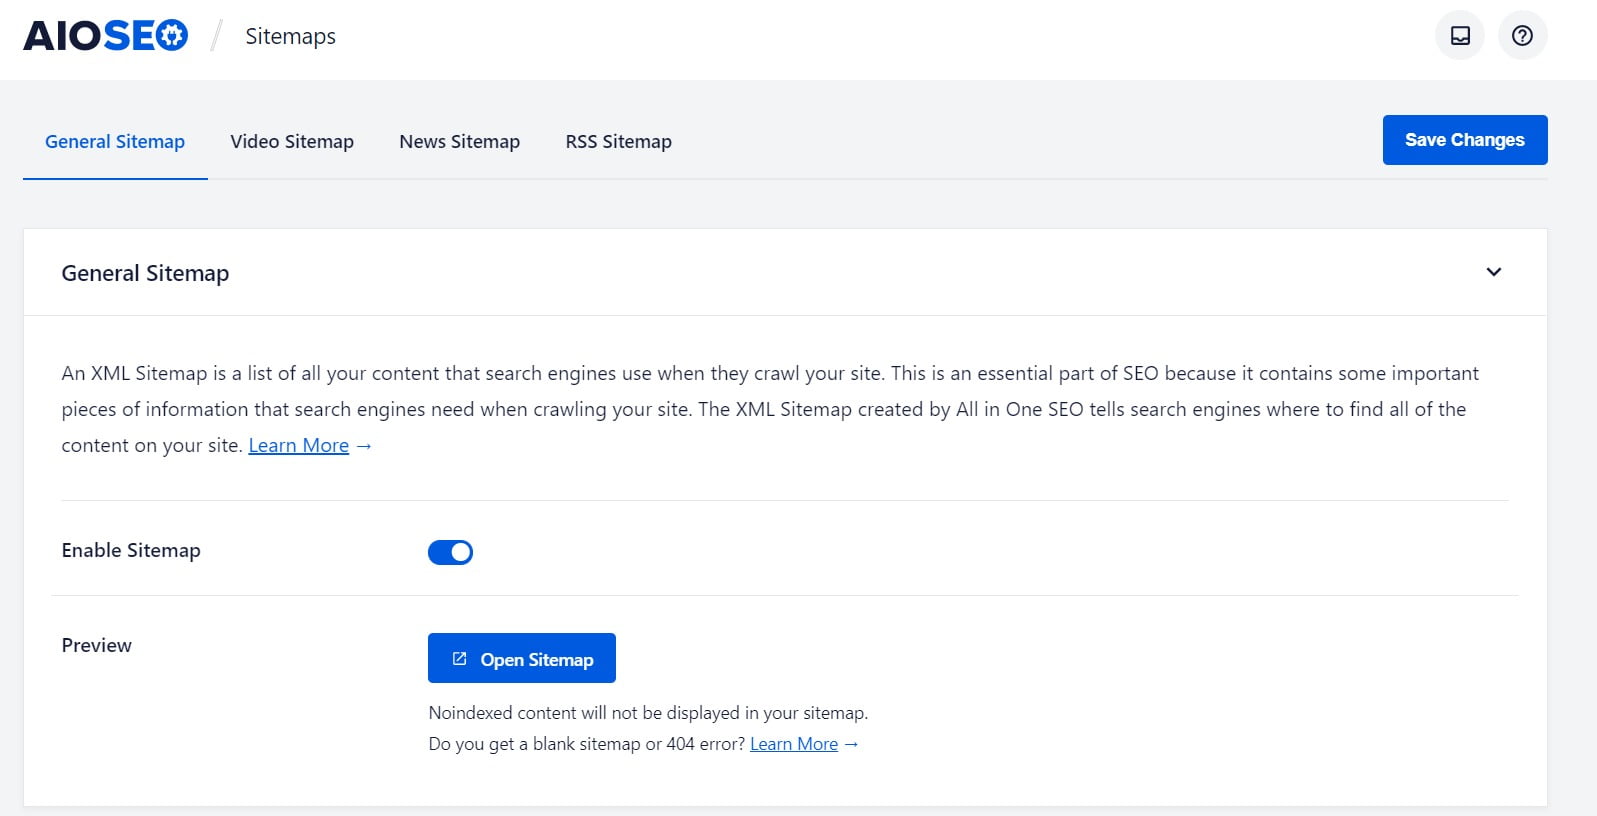
An XML sitemap is a plain list of all the content on your website. The sitemap assists search engine bots to quickly scan all the content on your site in one place. Without a sitemap, some of your web pages may never be incorporated in Google search results, and won’t receive any traffic. Sitemaps further help you tell Google which webpages you DON’T want to be featured in search results. This can help with duplicate content matters, and keyword cannibalization. Sitemaps can additionally help you bypass a weak content penalty by notifying Google not to crawl pages with little content. Here’s a step by step setup:
#2. Video Sitemap
AIOSEO » Sitemaps » Video Sitemap
All in one SEO offers one-click support for video sitemaps so that your Video content ranks in Google’s video carousel widget with increased traffic. AIOSEO’s video sitemaps are exclusively built to follow all of Google’s requirements while notifying the search engines of all-new video content recently uploaded to your site.
It allows you a free hand in unlocking rich snippets in your rankings and boosts your organic traffic. AIO also offers the ultimate convenience of 100% customizable Video Sitemaps. You can easily select the post types and taxonomies for your sitemap while also you can exclude certain categories pages, tags, and posts to avoid the automatic appearance. All you have to do is visit the Video Sitemap setting, then tick the enable sitemap option. The additional setting option will be right there in the same place.
#3. News Sitemap
AIOSEO » Sitemaps » News Sitemap
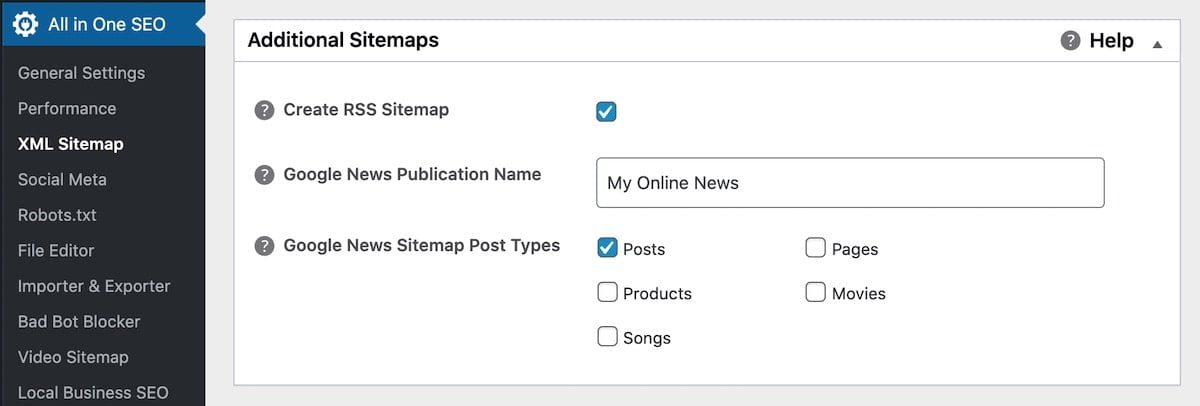
Another excellent feature of AIO SEO is News Sitemap activation. It allows the users to submit the latest added content to get featured in the window of Google News and therefore, it induces the generation of increased traffic and post views. The new publishers can reap the ultimate benefit of getting 6 billion clicks every month via Google News and AIO helps to achieve it. By enabling the News Sitemap, you can get more visibility in search results along with 60% more post credentials from the viewers.
To activate the AIO SEO News Sitemap, you need no coding skills or any technical expertise as the plug-in is easy to use and allows you to use the proper article schema tags and all the vital metadata. It just a few clicks like choosing the content types, posts, pages, and/or any custom posts type and customizing your publication name.
#4. RSS Sitemap
AIOSEO » Sitemaps » RSS Sitemap
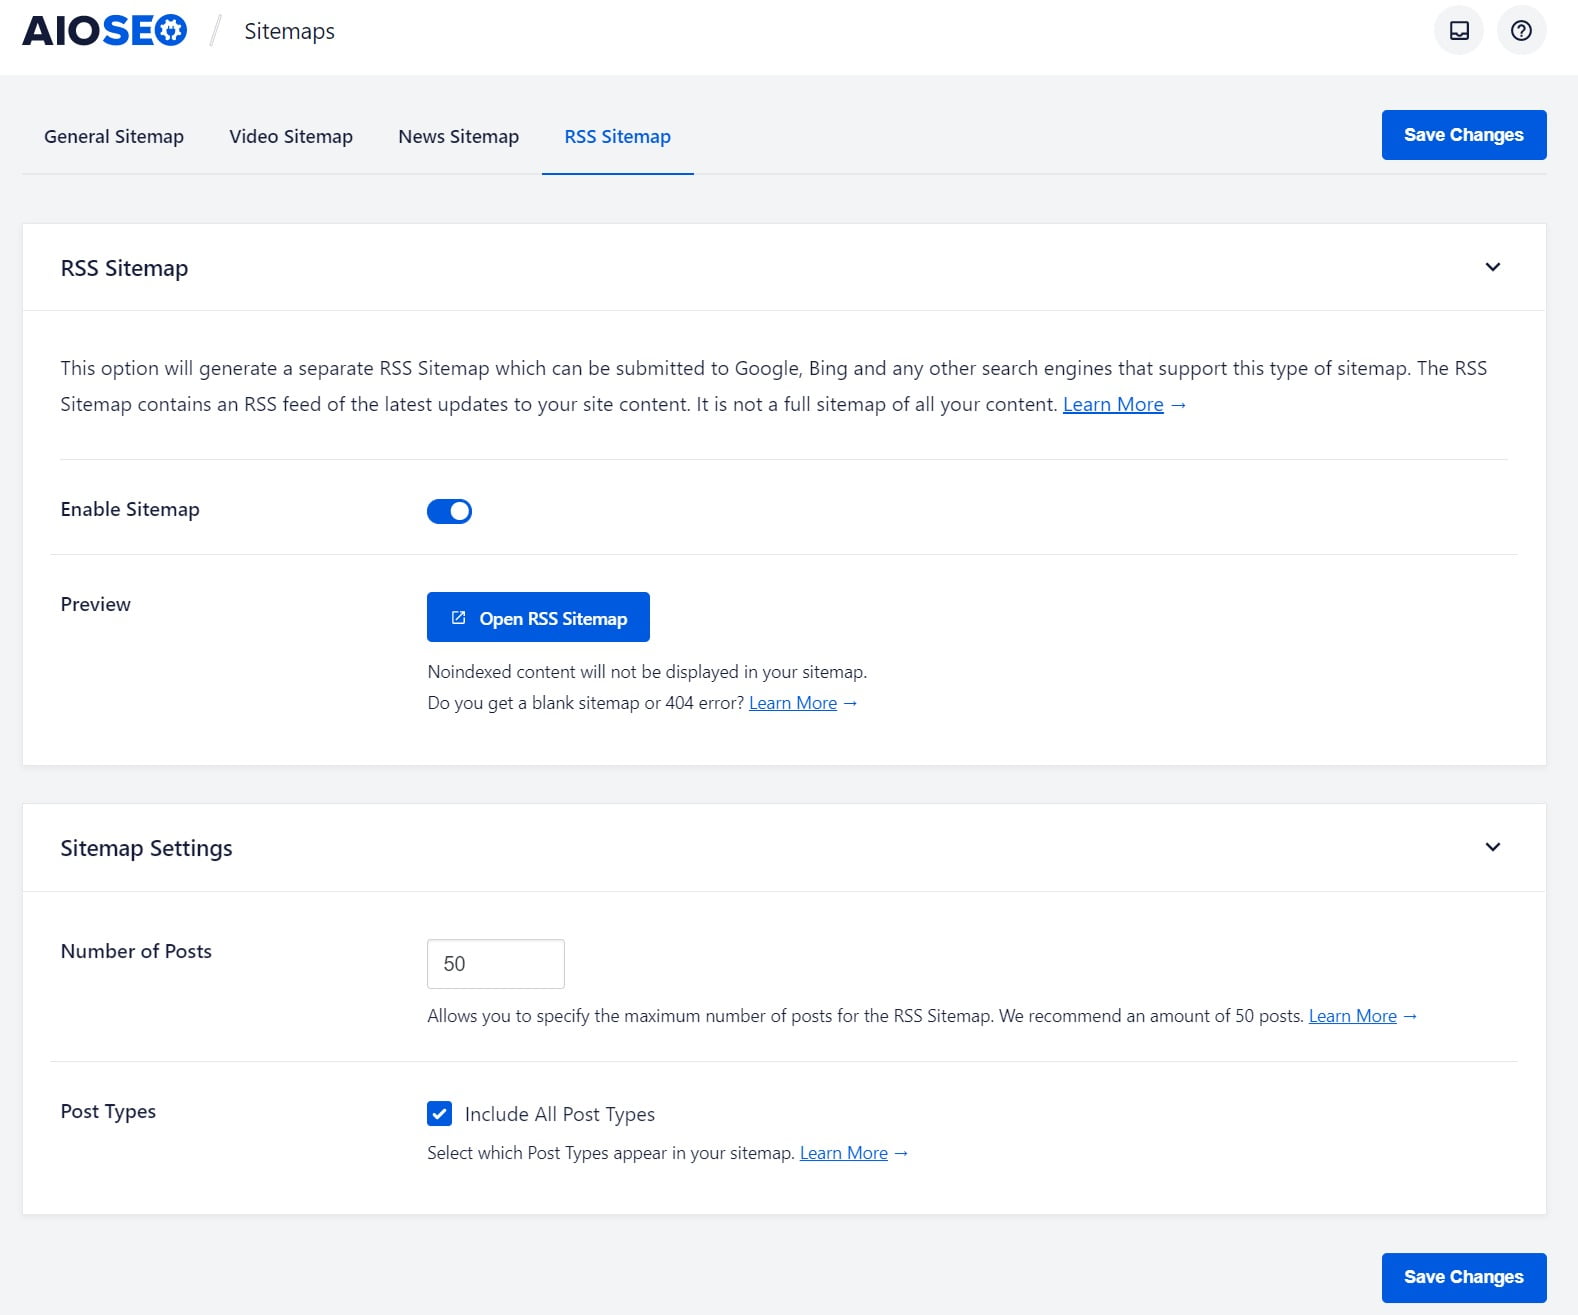
By default, All in One SEO generates two sitemaps- XML sitemap and RSS Sitemap. An RSS Sitemap is essential because search engines examine it much more often than an XML Sitemap. This indicates that content listed in an RSS Sitemap can emerge in search results much quicker than if you only have an XML Sitemap. An RSS Sitemap involves only the latest modifications and additions to your site. It’s much more diminutive and requires fewer resources from search engines to crawl it.
To enable your RSS Sitemap-
- First, ensure that you can view your RSS Sitemap.
- Go to Sitemaps in the All in One SEO menu and click on the RSS Sitemap tab at the top of the screen.
- You’ll see the RSS Sitemap screen and make sure Enable Sitemap is on. Click the Open Sitemap button to view your RSS Sitemap.
When it comes to the configuration of the RSS sitemap, decide how much content you want to be included in the RSS Sitemap. By default, AIO SEO will only include 50 posts in the RSS Sitemap. You can change this in the Posts Per Sitemap setting. It is to note that the RSS Sitemap is meant to be small and only contain the latest content. This is why the Posts Per Sitemap is set so low.
Next, to include content in RSS Sitemap, you will see a setting for Post Types which is set to Include All Post Types. You can remove specific post types from the RSS Sitemap by unchecking the Include All Post Types checkbox. When you uncheck this setting, you’ll see a list of all your post types and can select which to include in your RSS Sitemap. And thus, the configuration is completed!
SEO Analysis in All in One SEO
AIOSEO » SEO Analysis
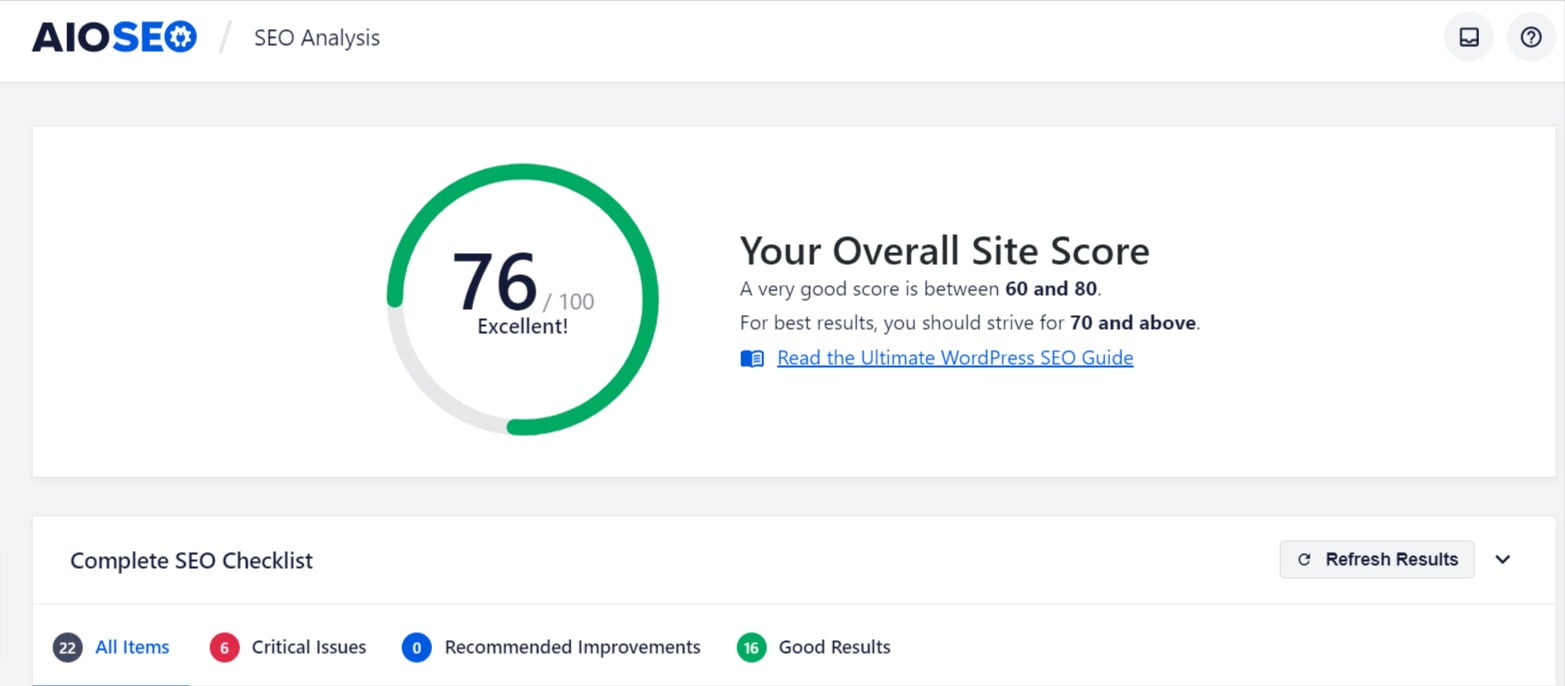
An SEO audit is a method of evaluating the search engine friendliness of your website. Every website has distinct features and an SEO audit delivers a tailored view of how properly your website is performing in Google’s scale of the algorithm. With proper auditing, your website can attain a stronger place to devise and execute a clear SEO policy and enhance the success of inbound marketing.
With AIO SEO, you can analyze your entire WordPress site to identify critical flaws and get actionable perspicacity to expand your optimization dynamics and generate more traffic. The plugin facilitates the analysis in seconds and you can follow the audit checklist setting for proper optimization. With AIO SEO, you can get access to all the resources to fix the critical errors through proper scanning and optimization of website speed and performance upshots.
Apart from SEO Audit Checklist, the insights of the AIO SEO audit can help you with competitor’s site analysis. It allows you to conduct a competitive analysis which is an imperative part of any modern business strategy because, without understanding how you stand against your competitors, it is difficult to know which opponents are your biggest threats, how to conquer them, or where you should direct your forces. If you manage a competitive analysis and apply it to improve your strategy, you’ll leap ahead of at least half of your market rivals. AIO SEO lets you handle all these aspects in one place.
Tools Setting In All in One SEO
#1. Robots.txt Editor and .htaccess Editor
AIOSEO » Tools » Robots.txt Editor
AIOSEO » Tools » .htaccess Editor
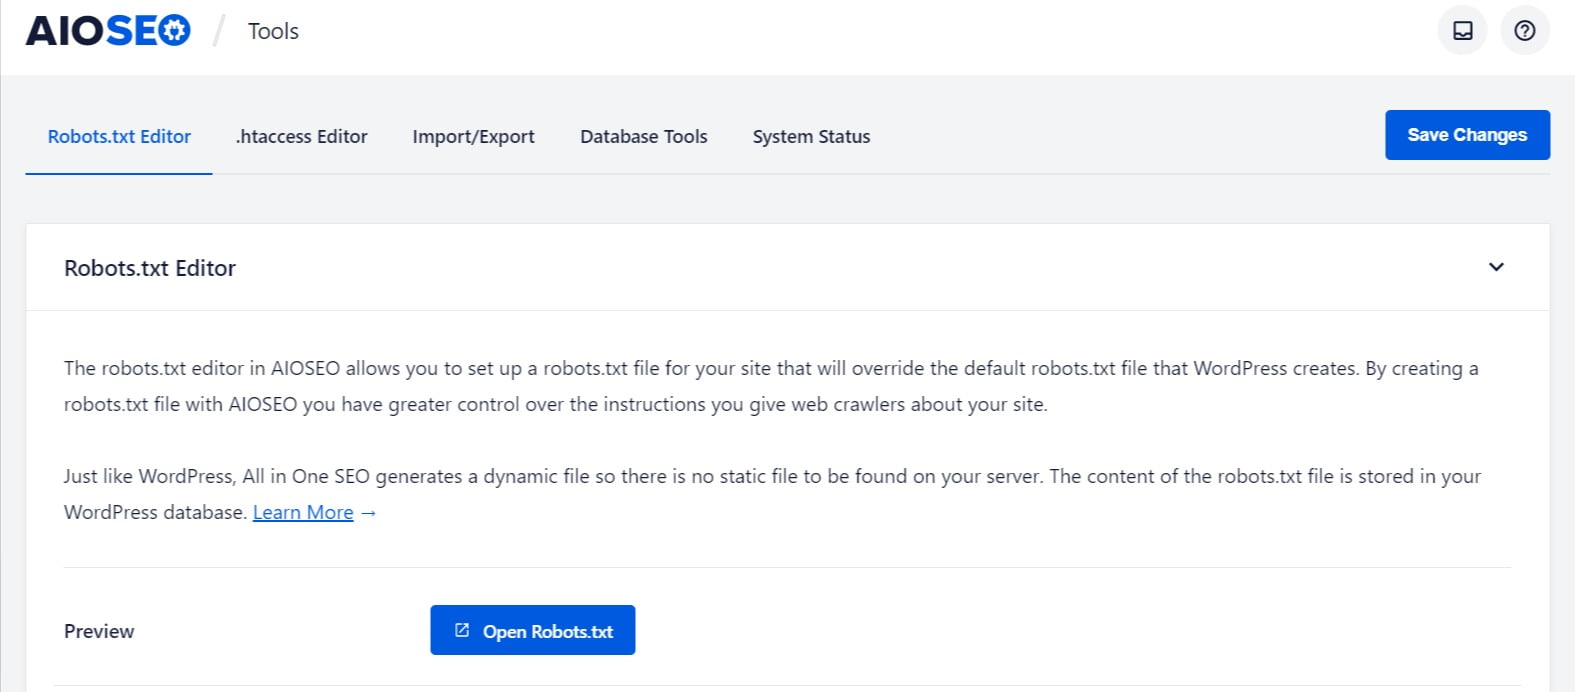
With the File Editor feature, you can directly edit the robots.txt and .htaccess files for your WordPress site. First, you have to enable the File Editor feature and you can proceed with the view and edit setting for robots.txt and .htaccess files. To activate the File Editor feature, you need to log into your WordPress Dashboard. Next, you need to click All in One SEO then Feature Manager in the navigation menu and then, scroll down to the File Editor feature and click the Activate button.
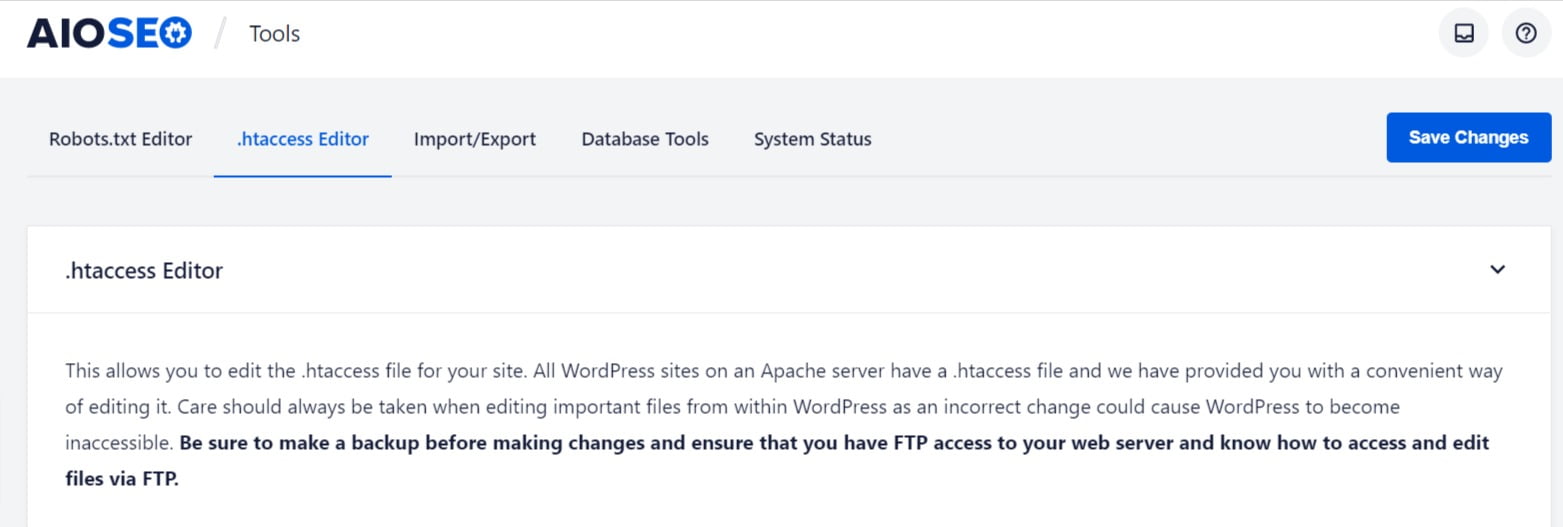
After activating the File Editor feature, next you would need to view and edit your robots.txt and .htaccess files. For that, click the File Editor link in the All in One SEO menu. Next, you need to click the robots.txt tab to view and/or edit the file and then, click the Update robots.txt button to save your changes. To edit and view and edit the .htaccess file, click the .htaccess tab to view/edit the file and after making modifications, you can click the Update .htaccess button to save your changes. And you are done with the setting.
#2. Import/Export
AIOSEO » Tools » Import/Export
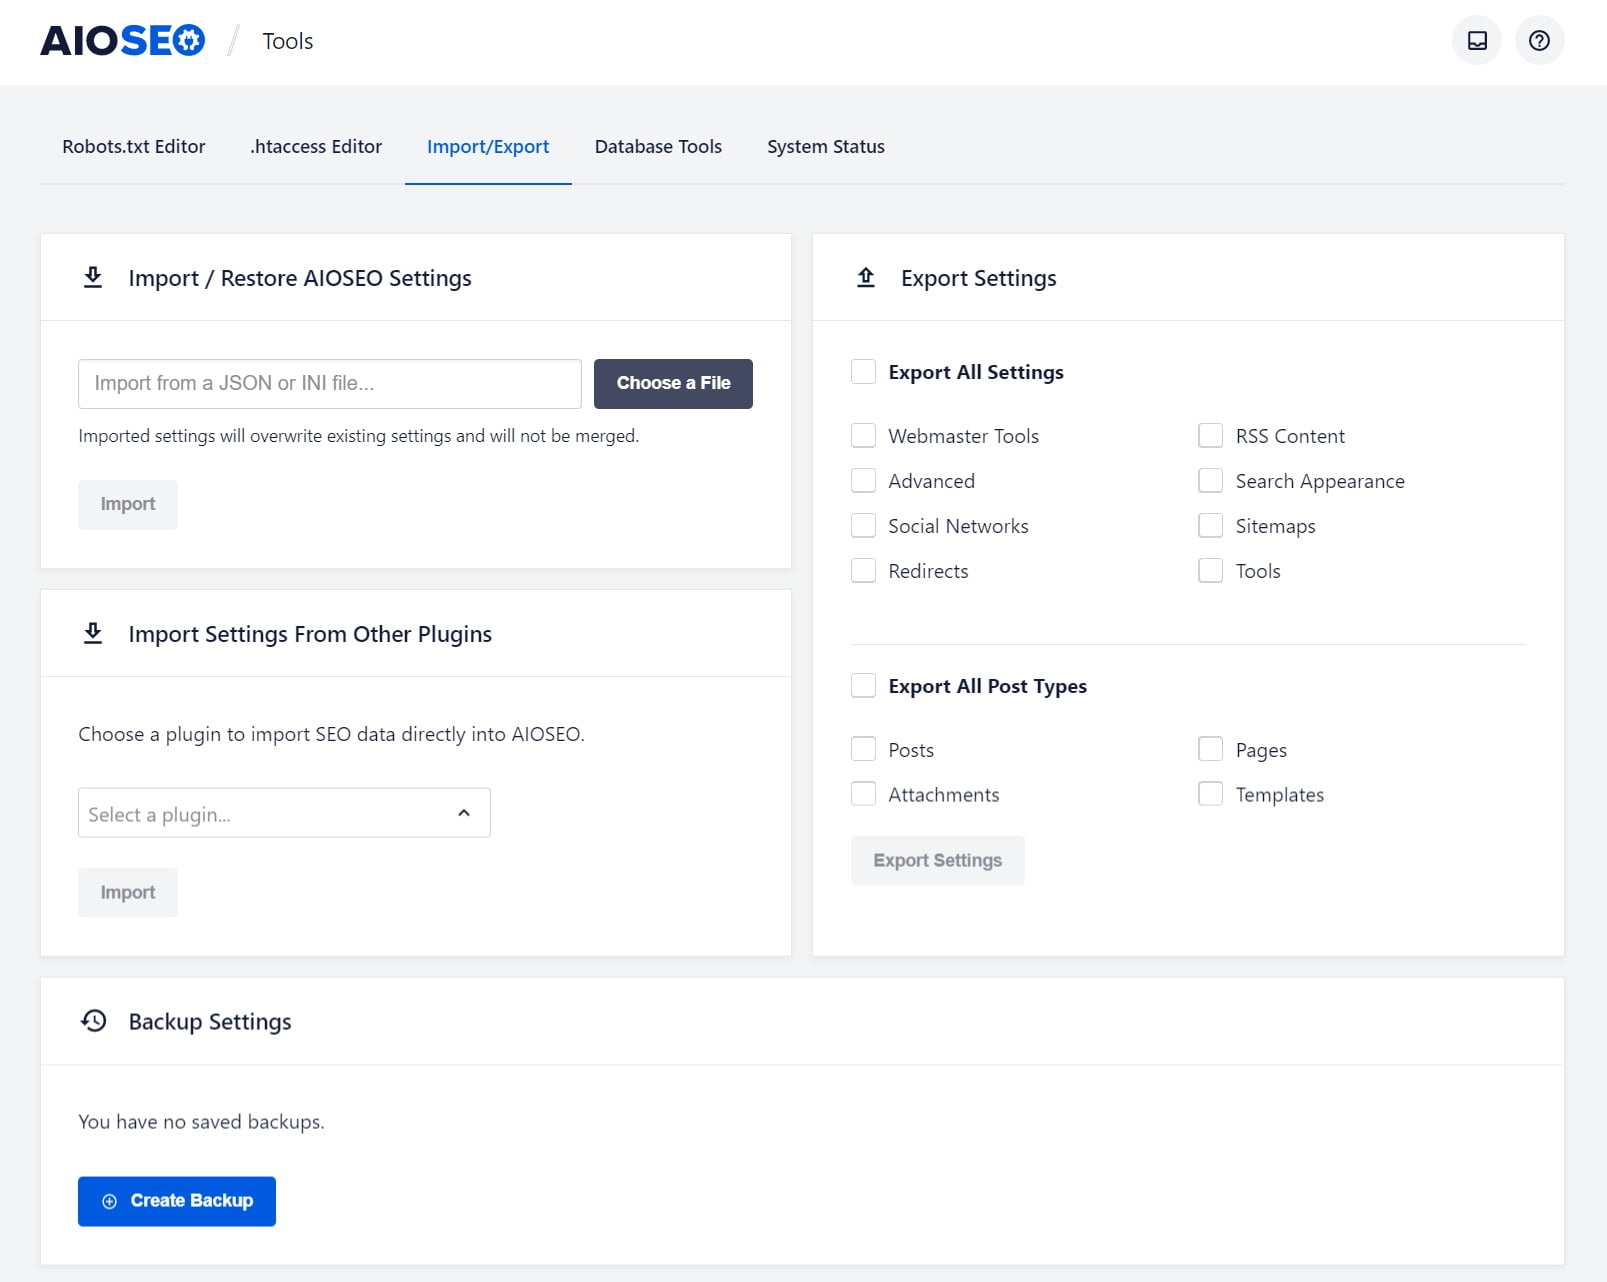
You can employ the Import / Export tool to import and export your settings and metadata, perform a backup of your settings, or import settings from additional popular SEO plugins.
Activating the Export feature in All in One SEO Settings:
- Log into your WordPress dashboard.
- Click “All in One SEO” then “Feature Manager”.
- Click “Activate” next to the “Importer & Exporter” tool.
- Click “Importer & Exporter” in the All in One SEO menu.
- Choose your export settings then click the “Export” button to save them.
Activating the Import feature in All in One SEO Settings:
- Click “Importer & Exporter” in the All in One SEO menu.
- Next to “Import” click the “Choose File” button.
- Choose the All in One SEO Pack settings file you want to import, then click the “Open” button.
- Click the “Import” button.
For importing and exporting AIOSEO Settings and MetaData, click on Tools in the All in One SEO menu and then click on the Import/Export tab. You can export your settings in the Export Settings area. Select the checkboxes for the settings you want to export, or click on the checkbox for Export All Settings.
To export SEO metadata for your content, select the checkboxes for the post types you want to export, or click on the checkbox for Export All Post Types. Once you’ve selected the checkboxes, click the Export Settings button. A file called aioseo-export-settings will be downloaded to your local computer. This contains the exported information.
For Importing Your Settings and MetaData, click on the Choose a File button and upload the aioseo-export-settings file. Then click on the Import button.
For importing settings from other plugins, click on Tools in the All in One SEO menu and then click on the Import/Export tab. In the Import Settings From Other Plugins section, click on the dropdown and select the plugin you want to import from. Select the checkboxes for the settings you want to import and click the Import button.
Top All in One SEO (AIOSEO) Features That Makes It Most Powerful WordPress SEO Plugin
Conclusion
It is quite evident that AIOSEO is the classic WordPress SEO plugin for a WordPress website and over 2,000,000+ smart business owners, marketers, and web developers prefer this plugin for their websites. AIOSEO makes it effortless to set up the customary SEO foundations in less than 10 minutes. Its smart setup wizard optimizes any website’s SEO settings with unique configurations. Furthermore, All In One SEO facilitates seamless integrations with all additional tools and popular social media platforms. Over 15 million websites appreciate the features offered by this plugin and AIO SEO has over 1,000 5-star reviews and industry-leading ratings from customers across the globe. So what are you waiting for? Get the most efficient All in One WordPress SEO plugin and enhance your website search rankings today!