

Table of Contents
Next.js Development
Build blazing-fast, SEO-friendly React websites and apps
- ✔️ Server-side rendering & static site generation
- ✔️ Built-in routing and API support
- ✔️ Optimized for performance and scalability
- ✔️ Ideal for modern web apps and marketing sites
![]()
Welcome to this exciting journey of website migration. In this guide, we’re gonna show you how to switch gears from ReactJS to the hottest thing in the web world – NextJs!
You might be wondering, “What’s all the buzz about NextJs?” Well, think of it as a turbo boost for your website. NextJs brings a bunch of cool features that’ll make your site faster, smoother, and more search engine-friendly. Don’t worry about technical mumbo-jumbo; we’ll guide you through the process like a friendly trail guide.
So, saddle up, and let’s hit the trail to wrangle some website magic with NextJs!
Table of Contents
Why do we even bother considering NextJs for websites?
NextJs is the real deal for websites nowadays. It’s got some fancy tricks up its sleeve that’ll make your site stand out from the crowd.
Faster Load Times: NextJs knows how to serve up your pages like lightning! With server-side rendering and static site generation, your visitors won’t have to twiddle their thumbs waiting for your site to load.
Smoother Page Transitions: Say goodbye to clunky navigation! NextJs handles it with style, making sure your users have a butter-smooth experience.
SEO Magic: We all wanna shine in search engine rankings, don’t we? NextJs has got some SEO magic with its SSR and SSG, giving your site better visibility to the search engine crawlers.
Thriving Ecosystem: NextJs ain’t ridin’ solo out there. It’s got a bunch of plugins and extensions, making it a real powerhouse for your web projects.
Who this guide is for – business folks, designers, and developers, too!
This guide’s open to everyone! Yep, whether you’re a business owner, designer, or developer, you’re welcome to join this rodeo.
Business Folks: If you run a business and wanna boost your online presence, this guide’s got you covered. NextJs can give your website the edge it needs to attract more customers and grow your brand.
Designers: You all play a key role in creating a website that’s eye-catching and user-friendly. With NextJs, you can unleash your creativity and still enjoy snappy performance.
Developers: Whether you’re a seasoned pro or just starting out, NextJs is a skill worth adding to your toolkit. This guide will show you the ropes of migration, and you’ll be a NextJs wrangler in no time.
So, come and join me on this adventure! Let’s make your website shine like a star in the night sky with NextJs!
Know Your Horses – Understanding ReactJS & NextJS
Before we hit the trail of website migration, let’s take a moment to understand our trusty companions – Create React App and NextJs. Create React App, provided by Facebook, is a reliable workhorse known for its simplicity, making it ideal for beginners and straightforward projects. On the other hand, NextJs is a fresh-faced newcomer packed with exciting features like built-in server-side rendering (SSR) and static site generation (SSG), offering a performance boost and SEO-friendly capabilities right off the bat. Now that we know our horses, let’s compare their features, pros, and cons to choose the best fit for our web journey!
A. ReactJS vs NextJS
| Feature | Create React App | NextJs |
|---|---|---|
| Definition | Javascript Library to building UI based on components | React framework that gives you building blocks to create web applications |
| Use Cases | Single-page applications (SPAs), web applications with complex user interfaces, component-based UI development, progressive web apps (PWAs). | Server-side rendered applications, static site generators, content-heavy websites, blogs, SEO-optimized applications. |
| Setup and Configuration | Easy setup, great for beginners | Quick setup with additional features |
| Server-side Rendering | Limited support, requires extra setup | Built-in SSR and SSG for better performance |
| Routing | React Router integration | Built-in routing with file-based approach |
| SEO-friendly | Requires extra work for SEO optimization | SEO-friendly features out of the box |
| Performance | Standard React performance | Performance boost with SSR and SSG |
| Code Splitting | Requires additional configuration | Automatic code splitting with dynamic imports |
| Ecosystem | Well-established with wide community support | Growing ecosystem with plugins and tools |
B. Breakin’ it down – the pros and cons of both
| Create React App | NextJs | |
| Pros | – Easy setup and great for beginners | – Built-in server-side rendering (SSR) and static site generation (SSG) |
| – Well-maintained and regularly updated | – Performance boost with faster page load times | |
| – Wide community support | – SEO-friendly features for improved search engine visibility |
| – React Router integration for routing | – Automatic code splitting with dynamic imports | |
| Cons | – Limited out-of-the-box SSR support | – May have a steeper learning curve, especially for beginners |
| – Requires extra setup for SSR or SSG | – Less control over some configurations due to built-in conventions |
Wrangling the Situation – Assessing Your Current Website
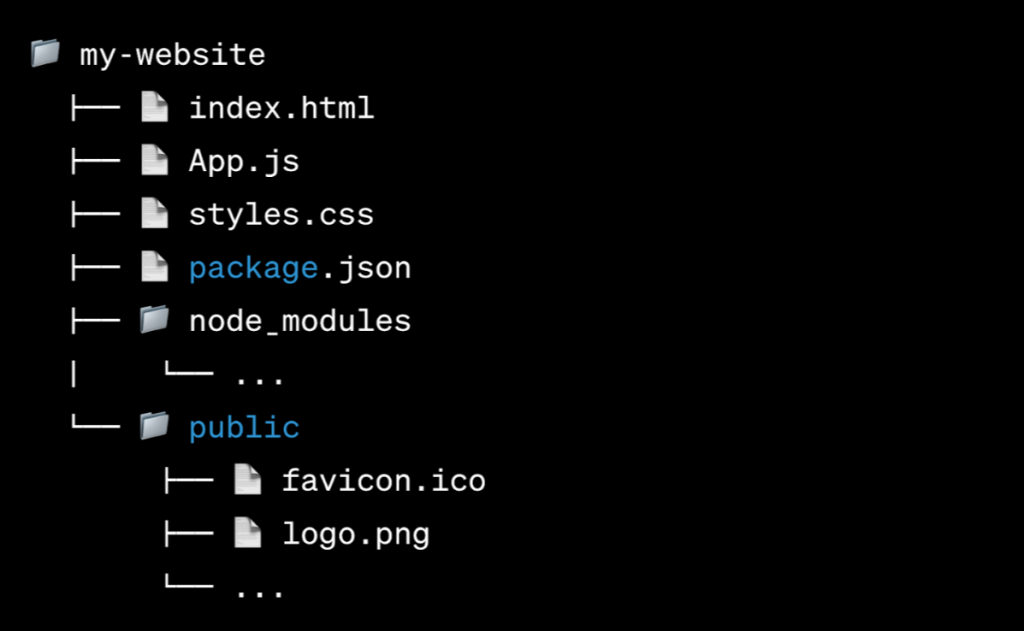
A. Taking’ a peek at your current setup – files, folders, and dependencies
Let’s get a good look at your current website setup. Round up the files, folders, and dependencies – it’s time for a thorough inspection. Take stock of your project’s directory structure, check for any custom configurations, and all the dependencies you’ve been using. Knowing what you’ve got will help us plan the best route for the migration.
Here is an example of what this may look like…
B. Spotting any hurdles ahead for the migration
Every trail has got its rough patches, and the migration trail isn’t any different. Let’s put on our cowboy hats and keep an eye out for any hurdles that might be waiting up ahead. Look for any React-specific features or third-party libraries that might need special attention during the migration. We’ll rope ’em in one by one and find the best way to handle them.
import React from 'react';
import { BrowserRouter as Router, Switch, Route, Link } from 'react-router-dom';

function App() {
  return (
    <Router>
      <nav>
        <ul>
          <li>
            <Link to="/">Home</Link>
          </li>
          <li>
            <Link to="/about">About</Link>
          </li>
        </ul>
      </nav>

      <Switch>
        <Route exact path="/">
          <Home />
        </Route>
        <Route path="/about">
          <About />
        </Route>
      </Switch>
    </Router>
  );
}
Now, let’s be on the lookout for any pesky hurdles on the trail. Say you’ve been using a third-party library like react-router-dom for navigation:
No need to fret! NextJs has got its own built-in routing system, so we’ll guide you on how to adjust your navigation for the smoothest ride.
C. Getting your website ready to ride into the NextJs frontier
Now that we’ve assessed the situation, it’s time to get your website ready for the NextJs adventure. Let’s say you’ve got a simple React component like this:
import React from 'react';

function Greeting({ name }) {
  return <h1>Hello, {name}!</h1>;
}

export default Greeting;
We’ll help you convert it into a NextJs-friendly page like this:
import React from 'react';

function Greeting({ name }) {
  return <h1>Hello, {name}!</h1>;
}

export default Greeting;

export async function getServerSideProps() {
  // Fetch data or perform actions before rendering the page
  return {
    props: {
      name: 'John', // Set a default name for now
    },
  };
}
We’ll walk you through every step, so you’re all set for the ride into the NextJs frontier!
Getting Started with NextJs
A. Using NextJs and the tools you need
First off, make sure you’ve got Node JS installed on your system – we’ll need it to run NextJs. Once you’ve got Node JS, you can easily use Next.js by using the following command in your terminal or command prompt:
npx create-next-app my-next-project
This will create a brand new NextJs project named “my-next-project” in your current directory. Yes sir, it’s as easy as that!
B. Starting fresh with a brand new NextJs project
Now that you’ve got your NextJs project all setup, it’s time to climb on that horse and start fresh! Head on over to your project directory and start the development server with this command:
cd my-next-project
npm run dev
This will fire up the development server, and you can preview your brand-spankin’-new NextJs application by visiting’ http://localhost:3000 in your browser.
C. Getting’ to know the lay of the land – the NextJs project structure
Let’s take a look at your new NextJs project. Here’s a look at the project structure:
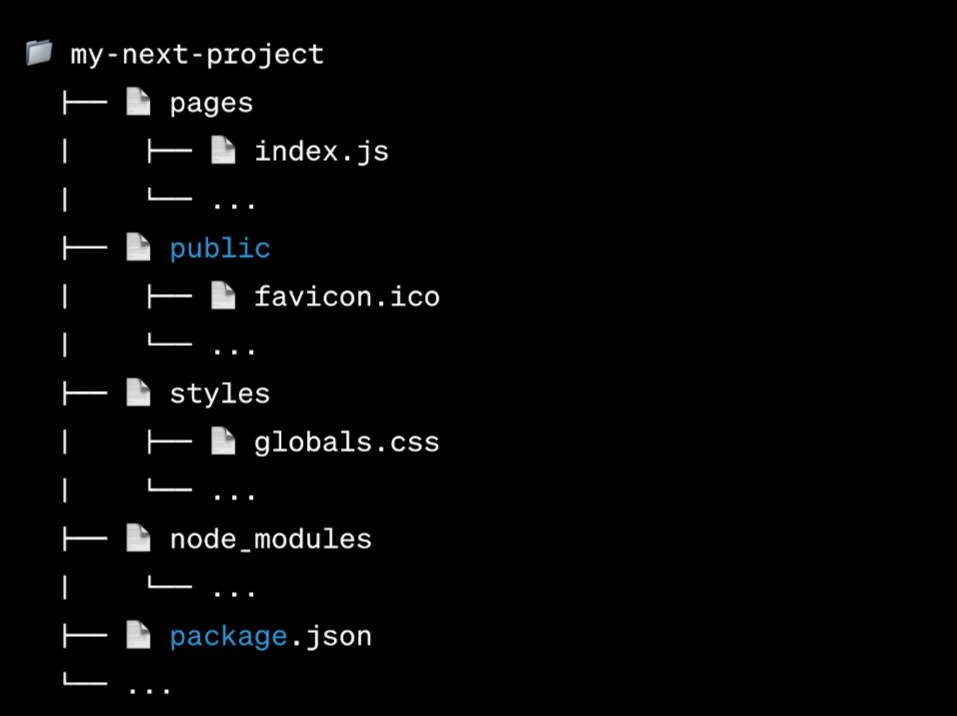
In NextJs, the pages directory is where the magic happens! Each file in the pages directory represents a route in your application. For example, index.js represents the home page, and you can create other files like about.js for the about page. Don’t forget about the public directory, where you can store your static assets like images or favicons.
There you have it, buckaroo! You’ve saddled up your NextJs project, and now you’re ready to ride into the wild west of web development. Happy trailblazing!
Rounding Up Components and Assets – Migrating Your Website
A. Mapping out your current React components to NextJs pages
Say you’ve got a React component like this in your previous project:
// Previous Project: components/Header.js
import React from 'react';

function Header() {
  return <header>Howdy, partner! Welcome to the website!</header>;
}

export default Header;
To migrate it to NextJs, create a new file named Header.js inside the pages directory, like so:
// Next.js Project: pages/Header.js
import React from 'react';

function Header() {
  return <header>Howdy, partner! Welcome to the website!</header>;
}

export default Header;
This is exactly the same, except NextJs will automatically treat this as a new page with the route /header. Just like that, we’ve mapped our React component to a Next.js page!
B. Sorting out the styles – global and modular – in NextJs
For global styles, create a globals.css file inside the styles directory. NextJs will handle it automatically without any extra effort.
/* Next.js Project: styles/globals.css */
body {
  font-family: 'Roboto', sans-serif;
  margin: 0;
  padding: 0;
}
Now, for modular styles, let’s say you have a component with its CSS like this:
// Previous Project: components/Button.js
import React from 'react';
import './Button.css';

function Button({ label }) {
  return <button className="custom-button">{label}</button>;
}

export default Button;
Move the Button.css file into the same directory as the component, and NextJs will handle the import for you:
// Next.js Project: components/Button.js
import React from 'react';

function Button({ label }) {
  return <button className="custom-button">{label}</button>;
}

export default Button;
Next.js will ensure that your styles are applied correctly to the components, just like you’re used to.
C. Keepin’ your static assets and resources safe during the move
Your static assets, like images, can find a new home in the public directory. For example, move your logo.png into the public directory like this:

Now, you can reference your image like this in your components:
// Next.js Project: components/Logo.js
import React from 'react';

function Logo() {
  return <img src="/logo.png" alt="Logo" />;
}

export default Logo;
NextJs will take care of serving the image from the public directory.
Managing Routing and Navigation
A. Navigating’ the differences between ReactJS and NextJS routing
In ReactJS, you might have used react-router-dom like this for client-side routing:
// Previous Project: routes/AppRouter.js
import React from 'react';
import { BrowserRouter as Router, Switch, Route } from 'react-router-dom';
import Home from '../components/Home';
import About from '../components/About';
import NotFound from '../components/NotFound';

function AppRouter() {
  return (
    <Router>
      <Switch>
        <Route exact path="/">
          <Home />
        </Route>
        <Route path="/about">
          <About />
        </Route>
        <Route path="*">
          <NotFound />
        </Route>
      </Switch>
    </Router>
  );
}

export default AppRouter;
In NextJs, you won’t need the react-router-dom library. Instead, you’ll use NextJs’s file-based routing. Create individual files for each page inside the pages directory, like this:
// Next.js Project: pages/index.js
import React from 'react';

function Home() {
  return <div>Howdy, this is the home page!</div>;
}

export default Home;
// Next.js Project: pages/about.js
import React from 'react';
function About() {
return <div>This is the about page!</div>;
}
export default About;NextJs will automatically handle the routing based on these files.
B. Giving your website some smooth client-side navigation in NextJs
To create smooth client-side navigation in NextJs, use the Link component from NextJs:
// Next.js Project: pages/index.js
import React from 'react';
import Link from 'next/link';

function Home() {
  return (
    <div>
      <div>Howdy, this is the home page!</div>
      <Link href="/about">
        <a>About</a>
      </Link>
    </div>
  );
}

export default Home;
NextJs takes care of the client-side navigation, so you’ll get that smooth transition between pages.
C. Handling dynamic routes and the query parameters
NextJs makes handlin’ dynamic routes and query parameters a breeze. Let’s say you have a dynamic route like this:
// Next.js Project: pages/posts/[postId].js
import React from 'react';
import { useRouter } from 'next/router';

function Post() {
  const router = useRouter();
  const { postId } = router.query;

  return <div>This is the post with ID: {postId}</div>;
}

export default Post;
When you visit /posts/123, NextJs will automatically fetch the data and render the page with the ID 123.
For query parameters, you can lasso ’em up using the useRouter hook:
// Next.js Project: pages/search.js
import React from 'react';
import { useRouter } from 'next/router';

function Search() {
  const router = useRouter();
  const { query } = router.query;

  return <div>Search results for: {query}</div>;
}

export default Search;
When you visit /search?query=cowboys, NextJs will fetch the query parameter and display “Search results for cowboys.”
Use Data Like a Pro – Data Fetching and API Integration
A. Fetching data in ReactJS – what you’ve been doing so far
In ReactJS, you might have been fetching data using libraries like axios or the built-in fetch API. You’d typically do this inside a use effect hook to fetch the data when the component mounts. Here’s an example of how you might have done it:
// Previous Project: components/PostList.js
import React, { useState, useEffect } from 'react';
import axios from 'axios';

function PostList() {
  const [posts, setPosts] = useState([]);

  useEffect(() => {
    axios.get('https://api.example.com/posts')
      .then(response => setPosts(response.data))
      .catch(error => console.error(error));
  }, []);

  return (
    <div>
      {posts.map(post => (
        <div key={post.id}>{post.title}</div>
      ))}
    </div>
  );
}

export default PostList;
B. Embracing NextJs data fetching methods – getStaticProps, getServerSideProps, and more
NextJs offers some powerful data fetching methods, depending on your needs. You got getStaticProps for static site generation (SSG) and getServerSideProps for server-side rendering (SSR). These methods allow you to fetch data at build time or request time, and NextJs takes care of the rest. Here’s an example of how you might use getStaticProps:
// Next.js Project: pages/posts.js
import React from 'react';

function Posts({ posts }) {
  return (
    <div>
      {posts.map(post => (
        <div key={post.id}>{post.title}</div>
      ))}
    </div>
  );
}

export default Posts;

export async function getStaticProps() {
  const response = await fetch('https://api.example.com/posts');
  const posts = await response.json();

  return {
    props: {
      posts,
    },
  };
}
C. Hooking up with APIs
NextJs makes hooking up with APIs a breeze! Whether it’s a REST API or a GraphQL endpoint, you can fetch the data right in your NextJs components. Let’s say you want to fetch data from a REST API:
// Next.js Project: pages/users.js
import React from 'react';

function Users({ users }) {
  return (
    <div>
      {users.map(user => (
        <div key={user.id}>{user.name}</div>
      ))}
    </div>
  );
}

export default Users;

export async function getStaticProps() {
  const response = await fetch('https://api.example.com/users');
  const users = await response.json();

  return {
    props: {
      users,
    },
  };
}
Keep Your Website in Line – State Management
A. Understanding state management options in NextJs territory
In the vast territory of NextJs, you have a few options for managing the state in your application. One popular approach is to use React’s built-in useState hook, just like you’ve been doing in ReactJS. It’s a simple and effective way to handle the local component state. But when your application gets larger and more complex, you might need to rope in some additional tools for more advanced state management.
NextJs plays well with other state management libraries like Redux, Zustand, or Mobx. These libraries allow you to centralize your application’s state and manage it more efficiently, making it easier to work with the data and keep your website in line.
B. Getting’ them state variables under control
When using useState in NextJs, it’s just as straightforward as you’ve been doin’ in ReactJS. Here’s an example of how you might use useState to manage a counter:
// Next.js Project: pages/Counter.js
import React, { useState } from 'react';

function Counter() {
  const [count, setCount] = useState(0);

  const handleIncrement = () => {
    setCount(count + 1);
  };

  const handleDecrement = () => {
    setCount(count - 1);
  };

  return (
    <div>
      <h2>Count: {count}</h2>
      <button onClick={handleIncrement}>Increment</button>
      <button onClick={handleDecrement}>Decrement</button>
    </div>
  );
}

export default Counter;
That’s how you keep the state variables under control with useState in NextJs!
And if you ever need to do something complex in state management, just consider working with libraries like Redux or Zustand.
Handling Side Effects and Lifecycle Methods
A. Differences in lifecycle methods between ReactJS and NextJs
On the dusty trail between ReactJS and NextJs, there are some differences in the way you handle lifecycle methods. In ReactJS, you might have used componentDidMount, componentDidUpdate, and componentWillUnmount in class-based components for managing side effects.
In the realm of NextJs and functional components, the go-to solution for handling side effects and lifecycle events is the use effect hook. Fear not, as this versatile and powerful hook can handle all sorts of side effects and keep your application running smoothly.
B. Adjusting your code with useEffect, componentDidMount, and the likes
Let’s say you’ve been using componentDidMount in ReactJS to fetch data when the component mounts. Now, with NextJs and functional components, you’ll be using use effect to achieve the same outcome:
// Next.js Project: components/PostList.js
import React, { useState, useEffect } from 'react';
import axios from 'axios';

function PostList() {
  const [posts, setPosts] = useState([]);

  useEffect(() => {
    // This code will run when the component mounts
    axios.get('https://api.example.com/posts')
      .then(response => setPosts(response.data))
      .catch(error => console.error(error));

    // The cleanup function for componentWillUnmount will be returned here (optional)
    return () => {
      // Any cleanup code you need goes here
    };
  }, []);

  // Render the list of posts
}

export default PostList;
With effect, you can perform data fetching and other side effects when the component mounts, just like componentDidMount in ReactJS. Additionally, you can include cleanup logic in the returned function from useEffect, similar to component will unmount.
Server-side Rendering (SSR) and Static Site Generation (SSG)
A. Getting ready for some server-side rendering and static site generation in NextJs
NextJs offers two powerful techniques for rendering your pages: Server-side Rendering (SSR) and Static Site Generation (SSG). SSR fetches data and renders the pages on each request, while SSG generates the pages at build time and serves them as static files.
With SSR, you can fetch data from APIs on the server and deliver a fully populated page to your users. On the other hand, SSG pre-renders the pages, providing blazing-fast loading times and better SEO.
B. Transforming your pages for SSR or SSG – better performance and SEO gold
Let’s see how you can transform your pages to leverage SSR or SSG. For SSR, you can use the getServerSideProps function inside a page file. It’ll fetch the data on each request and pre-populate the page before sending it to the user. Here’s an example:
// Next.js Project: pages/posts/[postId].js
import React from 'react';

function Post({ post }) {
  return (
    <div>
      <h1>{post.title}</h1>
      <p>{post.content}</p>
    </div>
  );
}

export default Post;

export async function getServerSideProps({ params }) {
  const { postId } = params;
  const response = await fetch(`https://api.example.com/posts/${postId}`);
  const post = await response.json();

  return {
    props: {
      post,
    },
  };
}
For SSG, you can use the getStaticProps function to fetch data at build time and pre-render the pages as static files. Here’s an example:
// Next.js Project: pages/posts.js
import React from 'react';

function Posts({ posts }) {
  return (
    <div>
      {posts.map(post => (
        <div key={post.id}>
          <h2>{post.title}</h2>
          <p>{post.content}</p>
        </div>
      ))}
    </div>
  );
}

export default Posts;

export async function getStaticProps() {
  const response = await fetch('https://api.example.com/posts');
  const posts = await response.json();

  return {
    props: {
      posts,
    },
  };
}
With SSR and SSG, your NextJs application will be blazing fast, performant, and SEO-friendly.
Testing and Debugging
A. Checking your website with testing frameworks for NextJs
Testing is essential to keep your NextJs website running smoothly and error-free. There are several testing frameworks you can use to ensure your code is in tip-top shape. One popular choice is Jest, a powerful and easy-to-use testing framework.
Jest allows you to write unit tests, integration tests, and even snapshot tests for your components. With NextJs’s built-in support for Jest, you can saddle up and start testing’ your website with confidence.
Here’s an example of a simple unit test using Jest for a NextJs component:
// Next.js Project: components/Button.js
import React from 'react';

function Button({ label }) {
  return <button>{label}</button>;
}

export default Button;

// Next.js Project: components/__tests__/Button.test.js
import React from 'react';
import { render, screen } from '@testing-library/react';
import Button from '../Button';

test('renders button with correct label', () => {
  render(<Button label="Click Me" />);
  const buttonElement = screen.getByText(/click me/i);
  expect(buttonElement).toBeInTheDocument();
});
B. Tracking down and solving bugs
Bugs can be as tricky as a slippery snake in the desert, but NextJs provides some handy tools to track ’em down and solve ’em. One of the most powerful tools is the browser’s built-in developer tools. Use the console and inspect elements to spot any errors or unexpected behavior.
Additionally, NextJs comes with a development mode that provides detailed error messages and stack traces to help you fix these bugs.
Deployment Considerations
A. Getting your website ready – production build in NextJs
Use npm run build or yarn build to create an optimized production build of your NextJs website.
B. Choosing the best places to host your site and go live
Consider hosting providers like Vercel, Netlify, or AWS Amplify for seamless integration with NextJs. Deploy your website with ease and enjoy automatic deployments, scalability, and excellent performance.
For example, if you choose Vercel, deploying your NextJs website is as easy as a quick ride:
- Install Vercel CLI with `npm install -g vercel`
- Use `vercel login` to log in to your Vercel account
- Navigate to your NextJs project directory and run `vercel`
- Follow the prompts to deploy your website to Vercel
Once deployed, your website will be live for the world to see at the provided URL. Time to celebrate, partner – your NextJs website is officially on the world wide web!
Wrapping Up – After the Move Tasks and Clean-up
A. Reviewing your migrated website for any fixes
After migrating to NextJs, take a look at your website and ensure everything is working smoothly. Check for any broken links, missing content, or layout issues.
For example, verify that all pages load correctly and that forms and buttons function as expected.
B. Clearing out unused code and dependencies like dust in the wind
Clean up your codebase by removing any unused code or dependencies. It’s like sweeping away dust in the wind to keep your project tidy and efficient.
For instance, if you previously used a library that is no longer needed in NextJs, remove it from your project to reduce unnecessary bloat.
C. Final testing and polishing up for a shiny new website
Before going live, conduct thorough testing on your NextJs website. Test it on various browsers, devices, and screen sizes to ensure consistent performance. Polish up any small issues to present a shiny and polished website to your users. For example, optimize image sizes, validate user inputs, and ensure responsive design.
With these after-the-move tasks and clean-up complete, your NextJs website will be ready to shine and impress your audience!
FAQs (Frequently Asked Questions)
Why Choose VOCSO?
At VOCSO, we take pride in being a premier web development company with a rich history of providing exceptional custom web and mobile application development services since 2009. Our commitment to innovation, excellence, and client satisfaction sets us apart in the industry. Allow us to share how we can assist you in achieving your digital goals.
Our team of skilled and experienced developers specializes in crafting tailor-made web and mobile applications that cater to your unique business needs. Whether you’re looking for a dynamic website, a feature-rich web application, or a user-friendly mobile app, we have the expertise to bring your vision to life.
At VOCSO, we understand that every project requires a dedicated and specialized approach. That’s why we offer the option to hire our dedicated resources, ensuring that you have a team of professionals solely focused on your project’s success. Our dedicated resource hiring model provides you with the flexibility and control you need to manage your development projects efficiently.
Hire AngularJS Developers
Leverage the power of AngularJS to build dynamic, interactive, and high-performance web applications. Our skilled AngularJS developers are well-versed in creating seamless user experiences and robust applications that drive engagement.
Hire ReactJS Developers
Create modern and scalable user interfaces with our expert ReactJS developers. With a deep understanding of React’s capabilities, we design and develop captivating user interfaces that enhance user satisfaction and contribute to your application’s success.
Hire Dedicated PHP Developers
Our dedicated PHP developers are proficient in crafting efficient and secure web applications using PHP frameworks. Whether you’re building an e-commerce platform, a content management system, or a custom web solution, our PHP experts deliver results.
Hire NodeJs Developers
Unlock the potential of real-time applications and microservices with our skilled NodeJs developers. We specialize in developing fast and scalable network applications that cater to your business’s unique requirements.
Hire NextJs Developers
As the digital landscape evolves, NextJs offers unparalleled benefits for web development. Our NextJs developers are well-equipped to harness the power of server-side rendering and static site generation, creating applications that are high-performing and SEO-friendly.
Conclusion
Congratulations on the successful migration to NextJs! Your website now boasts cutting-edge technology for exceptional performance and user experiences.
If you have any projects or ideas you’d like to discuss further, don’t hesitate to get in touch with us at VOCSO. We’d love to collaborate and bring your vision to life.